
Physical Tour
Canon SD750 (left), SD1000 (right) **Back**The back sides of the Digital Elphs are completely different. The Canon SD750 has a 3-inch LCD screen that takes up the entire left side of the camera and has a Canon logo at its bottom. On the right side, there is a strip of space less than an inch thick crammed with tiny buttons. At the top right corner is a print button with a blue LED in its center. There are bumps to the left of this button to perhaps aid in handling, although they don’t do a very good job. Below the print button is the playback button. Below this, and centered on the right side, is the multi-selector. It has labels all over it: ISO/jump at the top, flash on the right, burst/self-timer/delete at the bottom, and macro/landscape at the left. There is a Func./Set button in the middle. Below the multi-selector are two more buttons for the menu and display.
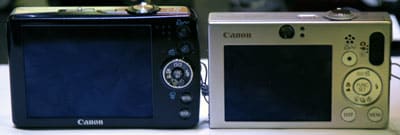
Canon SD750 (left) and the Canon SD1000 (right) The Canon PowerShot SD1000 has a different look on its back. The left side has a 2.5-inch LCD screen with a Canon logo above it and an optical viewfinder with two LED indicators. There is more space on the right side of the body for buttons, so the buttons are larger. In the top right corner is the mode switch that moves from playback to movie to still image shooting. This feature is located on the top of the SD750, and does not include the playback mode on it. On the SD1000, there is a speaker to the left of the mode switch along with the large print button. The multi-selector is below; it has a large Func./Set button in the middle of a ring that has the same icons on it that were on the SD750. Below the SD1000’s multi-selector are the same two buttons – Menu and Display – that were on the SD750, but they are horizontally aligned and larger. ** ****Left Side **The left sides of the cameras show bolts and seams. The SD750 has a speaker on this side too.

Left side of the SD750 **Right Side **The right sides of the cameras aren’t very exciting. There is an eyelet for a wrist strap in the center, and a cover near the top that hides the USB/AV and DC-in jacks.

Right side of SD750**
****Top **The tops of the two cameras are a little different. The Canon SD750 has a flashy diagonal line that connects the lighter front panel with the darker back. The mode switch is located just above this edge and the trapezoid-shaped power button just below. Near the right side is the shutter release button that is surrounded by an optical zoom ring.
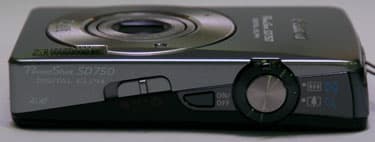
Top of SD750 The SD1000 has the same shutter release/zoom ring combination, but patterns the top in a neater manner. The lines are straight and there is a lighter band that runs across the top like on so many other point-and-shoot digital cameras. The power button is oval-shaped and located directly left of the shutter release mechanism on the SD1000. ** ****Bottom**The bottom of the Canon PowerShot digital cameras has a battery/memory compartment on the left side with a plastic lock on the door. To the right of the hinge and center is a tripod socket.
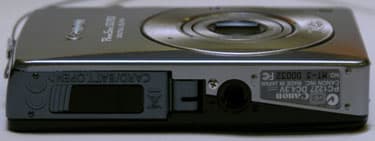
Bottom of SD750** **
Components
**

Viewfinder The Canon PowerShot SD750 doesn’t have room for an optical viewfinder, but the SD1000 does. The SD750 uses its LCD screen as a live preview, which is larger but less battery efficient; that will be discussed more in the next section. The Canon PowerShot SD1000’s optical viewfinder zooms when the lens zooms, and remains surprisingly accurate throughout. Some optical viewfinders are horribly inaccurate and cause portraits to be headless and such. This viewfinder sees a smaller view of what is actually recorded, but it is centered so at least no information will be lost. The only drawbacks are its size (it’s tiny, but there’s not much room for much else) and the blurry edges in the corners of the window. LCD Screen **
The LCD screen is another area where the cameras differ. It measures 3 inches on the SD750 and 2.5 inches on the SD1000. Both models have 230,000 pixels of resolution on the low-temperature polycrystalline silicon TFT displays. The resolution is much better than its predecessors that had 173,000 pixels on their LCD screens. Canon calls its new screen "Pure Color" and flaunts its wide viewing angles, scratch resistance, and anti-reflective coating. The screens did have impressive viewing angles in all directions, although it wasn’t as good viewing above and below than side to side. While it had an anti-reflective coating that reduced glare from the lights, that coating didn’t seem to work at all when a fingerprint greased the screen. The LCD screens of the cameras at the show were greased up from hundreds of people picking them up and playing with them and putting them down. The grease only reflected the lights from above, which made them look so much dirtier. The display info on the screen can be changed with the display button. While shooting, the info only appears or disappears – unless users have set grid lines or 3:2 guide lines to appear in the setup menu – or the image can be free of info. The SD1000’s screen also turns off. Both cameras have brightness adjustments in the setup menu with 15 levels. Both LCD screens are 100 percent accurate, which make them great viewfinders until put in direct sunlight. I didn’t get to see the LCDs under the light of day from the convention center, but there’s a reason Canon hangs onto its optical viewfinders and it’s probably because it’s superior when shooting in bright light. **Flash **

The built-in flash units are located in the upper right corners of the fronts; this is just where the left fingers wrap around the camera, so the flash may be blocked if users aren’t careful. The flashes are virtually the same component with identical specs. The flash reaches 1.6-11 ft when zoomed out and 1.6-6.6 ft when zoomed in. Canon also claims that the flash is effective from 1-1.6 ft in the macro mode, but it was too powerful and kept blowing out objects within that range. There is no flash compensation either, so users have to rely on the one flash power there is. It looks bad when subjects are closer than about 3 ft, but beyond that it looked decent on the show floor. The right side of the multi-selector accesses the off, on, and auto flash modes, while the recording menu turns on the red-eye reduction and slow sync. The flash units are just average for compact digital cameras; they definitely aren’t standout. **Zoom Lens**
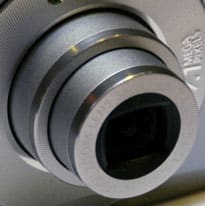
The PowerShot SD750 and SD1000 have the same Canon 3x optical zoom lens. It measures 5.8-17.4mm and moves through the range with a zoom ring that surrounds the shutter release button atop the camera. The ring is small with a small nub on the front that the finger can push around to activate. It isn’t very comfortable or sensitive. It stops at 6 focal lengths within its range and doesn’t move very smoothly; it seems to backfire for a quick moment before settling on a focal length. The Canon lens is equivalent to 35-105mm, which isn’t remarkably wide but certainly could be worse. The lens extends from the cameras in two segments and isn’t large at all. The max aperture when zoomed out is f/2.8, which has become the standard for compact digital camera lenses. When zoomed in, the aperture closes to f/4.9. Of note is the 4x digital zoom that can be turned off in the setup menu, and probably should be since it degrades image quality when used. Overall, the Canon lens is decent but – once again – not standout. It has a typical 3x range and uncomfortable control, but hardly any distortion at all. We would have liked to see these digital Elphs up to 4 or 5x optical zoom by now, but this gives us something to look forward to in the next batch of updates.
Design / Layout
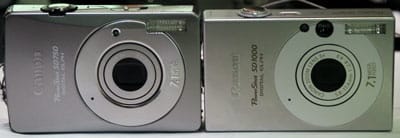
**Model Design / Appearance**The designs of the two digital cameras are completely different. The Canon PowerShot SD750 has a similar look to the Canon SD700 and many others in the Digital Elph line with the "perpetual curve" design, although the curve is toned down a little on this model. The SD750 has soft edges and goes for a flashier design. The Canon PowerShot SD1000 has sharper edges and is very boxy; it goes for a minimalist look. Both models are constructed from stainless steel and come in silver or black and silver colors. Both cameras had a few scratches in the finish. This is a trade show where lots of people handle the cameras though, so floor models get a year’s worth of use in about 3 days.** ****Size / Portability**The cameras differ in their measurements, but only slightly. The Canon PowerShot SD750 measures 3.61 x 2.24 x 0.77 inches and weighs 4.59 oz (body only). The SD1000 has smaller 3.38 x 2.11 x 0.76-inch dimensions and a weight of 4.41 oz. Both digital cameras have wrist strap eyelets on the right side for better portability, and the weight won’t break wrists either. The weight feels just as it should with those dimensions: the cameras aren’t heavy, nor are they light. **Handling Ability**The cameras handle a little differently with the SD750 being the more comfortable of the two. Neither model is truly a joy to handle though. The SD750 has a bent right side that feels better on the hand than the SD1000’s straight edge. The SD750 makes an attempt at decent handling by including some bumps in the upper right corner of the back. These really don’t help much though unless shooting with both hands. The size of this camera makes it a candidate for one-handed shooting though, where the thumb is better employed supporting the bottom of the camera. There aren’t many handling features on the SD750, but there are even less on the boxy Canon SD1000. Its edges are sharp and boxy. **Control Button / Dial Positioning / Size **

The controls vary on the two cameras, so I’ll start with the SD750. It has a mode switch atop the camera that moves between movie, scene, and still image shooting modes. The power button is up here too; it has an interesting trapezoid shape that is flashy looking. There is also a zoom ring surrounding the shutter release button on the right side of the SD750’s top. The tiny nub on the zoom ring isn’t very comfortable to move. On the back of the PowerShot SD750, the screen takes up most of the available real estate. Thus, the buttons are undersized and crammed together. The multi-selector is centered on the right side and covered in icons signifying the many functions. The center of the control is a Func./Set button that accesses a menu and makes selections. A ring surrounds the dial with loads of icons. From the top and moving clockwise, they are 1) jump and ISO, 2) flash, 3) burst, self-timer, and delete, and 4) macro and landscape. The multi-selector is comfortable and works very well. It has a bowl-shape that cradles the thumb. When it is touched lightly, "touch icons" appear on the LCD screen so users can see what they’re pushing when their thumbs are covering the control. If users rub the multi-selector the right way, they can scroll through shooting modes. This isn’t as seamless as a rotary wheel, but is interesting nonetheless. The other buttons on the back of the SD750 are too tiny. The Canon PowerShot SD1000’s mode switch is located on the back instead of the top and moves between movies, stills, and playback. This setup isn’t as nice because it takes more time to go from the playback mode to a shooting mode when compared to the SD750’s setup. The SD1000 has larger buttons on the back that are properly spaced too. The multi-selector doesn’t have the touch function or the bowl shape, but has all the same icons and functionality. The most important button on the camera, the shutter release, is the same as the one on the SD750. Both travel smoothly and have a distinct stop at the exposure lock before being pushed to capture.** ****Menu**The menus are just about the same, but the ones on the SD1000 are displayed on a smaller screen. They both have the same setup that lists frequently accessed settings in a short menu that can be found by pushing the Func./Set button. The "shooting mode" portion of this menu varies from where the mode switch is set. It provides a nice live view so users can see the effects of their choices in the menu. The other menu is found with the menu button and does not have live views. It is the same menu that appears on other PowerShot digital cameras with the gray background and colored tabs to organize the menu pages. That recording menu is only the first page of the three-tabbed menu. The second tab is yellow with hammer and wrench icons. It is the setup menu, shown below. The menus look much nicer on the 3-inch LCD screen of the SD750 simply because the font is larger and thus more readable. The third menu in the series of tabs has a host of options that allows users to customize the camera’s beep sounds and startup images, among other things. **Ease of Use **Like other Canon PowerShot digital cameras, the SD750 and SD1000 are easy to use. The lack of a mode dial and the split menu system may confuse some people but many will appreciate the easy access and live views from the Func./Set menu. There is no in-camera help guide on this model like there is on some other compact models from other manufacturers, but the SD750 and SD1000 are very intuitive anyway.
Modes
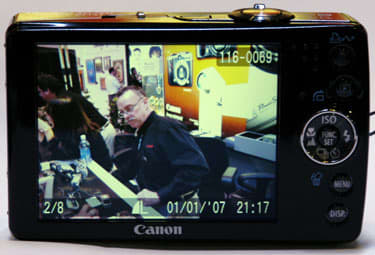
**Auto Mode From here on out in this review, the two cameras are virtually the same. Their appearances are different as explained in the previous sections, but the exposure modes and settings are all the exact same. The auto mode is listed among all the other modes in the Func./Set menu; this means there is no easy one-touch access like on many digital cameras. Once there, it is easy to use though. It automates everything except the image size and compression. The recording menu is still available along with the functions on the multi-selector. Movie Mode**On both cameras, the mode switch includes a setting for the movie mode. The movie mode on these cameras isn’t going to replace a camcorder any time soon, but it’s still decent. The video resolution is good with a top quality of 640 x 480 pixels at 30 fps. Other resolutions and capture speeds can be selected too: 640 x 480 at 15 fps, 320 x 240 at 60, 30, or 15 fps, and 160 x 120 at 15 fps. The smallest video size can only shoot for 3 minutes, while the smoothest 320 x 240, 60 fps video only records for 1 minute. This is the same as other PowerShot digital cameras with the exception of the new Canon TX1, which records the fast frame rate movies for up to an hour and can also capture 720p HD video at 30fps. Other video on the SD750 and SD1000 can capture up to 4GB or an hour of footage, whichever comes first. Unfortunately, the optical zoom is not functional during video capture, which will disappoint many users. The 4x digital zoom can be used, but it makes the image look grainy. The white balance and My Colors modes are accessible in the movie mode, and there are even Color Swap and Accent movie modes. These don’t have much practical application, but could be fun for kids to play with. There is also a time lapse movie mode that can shoot either 1 or 2 frames per second for up to 2 hours. The frames are then strung together in a Motion JPEG mode and played back at a rate of 15 fps. **Drive / Burst Mode**When the bottom of the multi-selector is pushed, the burst and self-timer modes appear. The Single drive is the default, and the Continuous burst mode appears only in the "manual" mode. When activated, the burst mode snaps along at a rate of 1.7 fps. Once again, this isn’t impressively fast and isn’t a standout feature. The self-timer modes included on the camera delay the shutter for 2 or 10 seconds. There is also a custom self-timer that can be set to delay 1-30 seconds before snapping a string of 1-10 pictures. **Playback Mode **The playback mode is accessed in different ways on the two cameras. The Canon SD750 has a small playback button on the back of the camera that makes it quick and simple to get in and out of playback mode. The SD1000, on the other hand, places the playback mode on the mode switch so it isn’t as easy to go from viewing to shooting. The playback mode displays images one by one or in index screens of 9 thumbnails if the "W" side of the zoom control is pushed. Pushing it the other way magnifies the image up to 10x. Individual pictures automatically rotate in the playback mode, and will actively rotate whether the camera is held vertically or horizontally so it’s always right side up. A histogram can be viewed when the display button is pushed, and the file info can be viewed or hidden.
Sound memos can be added up to 60 seconds for each image file, and there is a sound recorder function in the playback menu that has nothing to do with imaging. Below is the playback menu.
Movies can be played back normally with VCR-like control or in slow motion and can be split into two separate files. Images and movies can also be erased one by one with the bottom of the multi-selector or erased by date, category, or folder. They can be erased all at once too. These PowerShot digital cameras are designed to sort through large numbers of photos. A jump function eases navigation by providing quick access to every 10th shot, 100th shot, category, folder, date, or movie. Pictures can be tagged into different categories like people, events, and scenery so they can be found faster later. All in all, the playback mode has lots of options to organize, view, and edit pictures. **Custom Image Presets**The scene modes are located in different places on the two digital cameras. On the PowerShot SD750, the scene modes have a designated scene position on the mode switch. On the SD1000, they are found among all the other exposure modes in the menu. The options are the same on both though: Portrait, Foliage, Snow, Beach, Fireworks, Aquarium, Underwater, Indoor, Kids & Pets, and Night Snapshot. The exposure compensation is available in each of these scenes, along with the image size and compression. Of note is the optional underwater housing that can be purchased with this camera; don’t think the underwater mode will last long without one.
Control Options
**Manual Control Options The Canon PowerShot SD750 and SD1000 don’t have many manual controls, but what they do have is crammed into a few menus. The options are discussed below. Focus***Auto Focus Canon’s through-the-lens auto focus system normally focuses from 1 ft, but can get as close as 1.2 inches in the macro focus mode. The SD750 and SD1000 come with Canon’s Digic III image processor that has face detection technology built into it. The face detection system can recognize up to 9 faces at a time, and it has done so on other PowerShot digital cameras. Previous models worked quickly and more effectively, but the SD750 and SD1000 seemed a little sluggish in this area. Once again, this could be an issue with the pre-production models that could be worked out by the time the final product is released. When the face detection isn’t on, the AiAF is. The auto focus system works well and quickly on these digital cameras as there is hardly any shutter lag; the face detection could be snappier on these though - we'll see if improvements are made on the final production models. *Manual Focus
*These models cannot manually focus. *ISO**The Canon PowerShot SD750 and SD1000 have the same wide ISO range. Manual ISO settings include 80, 100, 200, 400, 800, and 1600. There are two automatic settings: the standard auto and high ISO auto for lower light situations. These models also include a brand new feature on PowerShot digital cameras called Auto ISO Shift. This senses when images are vulnerable to blur and displays a blinking hand icon on the LCD screen. While that icon blinks, the print button’s blue LED blinks too: this signals that the ISO could be boosted to reduce blur if desired. The ISO only boosts if users push the blinking button. This is an interesting feature that ensures great shots even in less than perfect lighting. The ISO settings are located at the top of the multi-selector, while the Auto ISO Shift feature can be activated in the recording menu. **White Balance In the Func./Set menu with a large preview are the white balance options. These include Auto, Daylight, Cloudy, Tungsten, Fluorescent, Fluorescent H, and Custom. The latter white balance can be set by framing something white in the tiny box that appears in the center of the screen and pushing the menu button, like on other PowerShots. There are on-screen directions to do this. The white balance presets cover the basics, but don’t get too elaborate: there are no underwater or flash settings. Exposure The exposure settings cannot be manually adjusted, but there is a basic exposure compensation option with +/- 2 settings in 1/3-EV steps. There is a live view of this in the Func./Set menu as users scroll through with the multi-selector. Unfortunately, a live histogram isn’t available on the Canon SD750 and SD1000, but a histogram can be seen in the playback mode. Metering The metering mode is in the Func./Set menu, but it can only be adjusted when in the "manual" mode. Evaluative, center-weighted average, and spot metering modes are on hand. The spot mode is fixed to the center of the image, and the default evaluative mode measures from wherever the camera deems the focus to be. This means that the metering syncs with the face detection auto focus mode when that is activated to properly expose the faces. Shutter Speed Shutter speeds cannot be manually chosen on these PowerShot digital cameras, but the automatic adjustments range from 15-1/1500th of a second. The shutter speed appears in the file information that can be shown or hidden with a touch of the display button. Aperture **Canon’s 3x optical zoom lens has a standard, but still good, f/2.8 max aperture. When the lens is zoomed out, the max shrinks down to f/4.9, which isn’t great but is better than some competitors’ lenses.
Image Parameters
**Picture Quality****/ Size Options**A 1/2.5-inch CCD remains under the hood of the Canon PowerShot SD750 and SD1000. It has 7.4 total megapixels on it and 7.1 effective. With those, it allows users to choose from the following selection of image sizes: 3072 x 2304, 3072 x 1728 (16:9), 2592 x 1944, 2048 x 1536, 1600 x 1200, and 640 x 480. These can be found in the Func./Set menu along with the JPEG compression settings of SuperFine, Fine, and Normal. **Picture Effects Mode**Canons are known for their picture effects modes, called My Colors in the cameras. This PowerShot, like others released in the past year, offers the color modes in recording and playback modes. Vivid, Vivid Blue, Vivid Green, Vivid Red, Neutral, Sepia, Black & White, Positive Film, Lighter Skin Tone, and Darker Skin Tone can be set. In the recording mode, there is also a Custom Color option grouped with the other options in the Func./Set menu. It allows users to adjust the contrast, saturation, sharpness, skin tones, and red, green, and blue channels on +/- 2 scales with whole steps. Color accent and color swap modes are listed among the exposure modes but are basically color filters of sorts. They aren’t entirely useful, but are interesting to play with when the pictures don’t really matter. Users can select colors almost the same way they select the white balance, then swap them or accent them by making everything else in the frame that isn’t the selected color black & white.** **
Connectivity / Extras
**Connectivity***Software*

The SD750 and SD1000 come with CD-ROMs with a suite of organizational and editing software. *Jacks, ports, plugs*There are two jacks beneath a small square-shaped door on the right side of the camera. One jack hosts the USB 2.0 hi-speed mini-B jack and doubles as the AV jack, which can be set to output in NTSC or PAL standard via the setup menu. The other round jack is for the optional DC-in cable.* **Direct Print Options*The Canon SD750 and SD1000 are PictBridge compatible and connect with the supplied USB cable. Print orders can be made from the playback menu, where users can select which pictures to print and how many of each to make. Pictures can be printed by category, date, and folder. All pictures can be printed at once. Print orders can be deleted or saved, then transferred to a printer at a later date via the LED-adorned print button. *Battery*

The SD750 and SD1000 come with a rechargeable NB04L lithium-ion battery that gets 210 shots per charge. Both cameras have battery indicators that flash when there is about 2 minutes of power left. The SD1000 has an opportunity to save battery power when needed by shutting off the LCD screen and relying on the optical viewfinder. The PowerShots come with wall-mount battery chargers. *Memory*There is no internal memory on these digital cameras and they only come with 16 MB cards, which can only hold 9 pictures at full resolution. They accept SD, SDHC, and MMC memory cards in a slot next to the battery in the compartment on the bottom of the camera. **Other features***Stitch Assist* – These assists can be found among the exposure modes and can be set to assist from left to right or right to left. The "assist" means that once users snap one picture, a side of the image remains to help line up the next shot, and the next, and so on. These can be used to create panoramas, but they can’t be stitched together until they are uploaded into the included software. *Digital Macro* – This mode also resides with the other exposure modes. It can focus from 1.2-3.9 inches. Its live preview looks pixilated, but when the exposure is locked the view becomes smooth again. This macro mode doesn’t provide much advantage over the standard macro mode though. *Sound Recorder* – This feature is located in the playback menu, although it is an odd placement for it because it has nothing to do with the playback of images. The sound recorder feature records mono audio at three different sampling rates: 44.100 kHz, 22.050 kHz, and 11.025 kHz. Background noise garbled the audio, but voices within about 6 ft can be heard clearly.
Overall Impressions
**Value**The Canon PowerShot SD750 retails for $349 with its best feature being its 3-inch LCD screen. Taking runner-up with standard features is the $299 Canon PowerShot SD1000. Neither camera has stellar features deserving of their retail prices, though the addition of the Auto ISO shift feature is compelling. However, the point-and-shoot market is now saturated with full-features models that sell for less. **Who It’s For***Point-and-Shooters* – The Canon PowerShot SD750 and SD1000 are built for this audience with their automated modes and compact forms. *Budget Consumers* – These PowerShots aren’t standout models and their prices stand out a bit too much. Budget consumers will pass by the SD750 and SD1000. *Gadget Freaks* – There isn’t much to look at on these models; nothing really stands out as a gadget lover’s dream. *Manual Control Freaks* – These are not the cameras for this crowd. *Pros/Serious Hobbyists* – The lack of manual control and legitimate handling features makes it a no go here.
Conclusion
**Conclusion**The Canon SD750 and SD1000 fall in the middle of the Digital Elph line with their standard feature set and 7.1 megapixels. The models above these have flashier features like optical image stabilization and longer lenses. Those below in the lineup have smaller LCD screens with less resolution.
There are hardly any standout features on these cameras, other than the addition of the Auto ISO shift feature. There’s nothing to hate, but nothing to love either. The cameras are solid, but pricy. The ho-hum PowerShot SD750 and SD1000 retail for $349 and $299, respectively, which is a bit much for a market that is saturated with flashier, feature-laden competition.
Photo Gallery
Meet the tester
Emily Raymond
Editor
Emily Raymond is a valued contributor to the Reviewed.com family of sites.
Checking our work.
Our team is here for one purpose: to help you buy the best stuff and love what you own. Our writers, editors, and lab technicians obsess over the products we cover to make sure you're confident and satisfied. Have a different opinion about something we recommend? Email us and we'll compare notes.
Shoot us an email