
Testing / Performance
To test how accurately the A520 reproduces colors, we capture a sequence of exposures of the GretagMacbeth color chart, which has become accepted as a standard measure of ideal colors, under controlled lighting and import the files into Imatest Imaging Software. The software is used to read the images and determine how accurate each rendered tone is compared to the corresponding ideal. The chart below displays the results; for each color tile, the outer square is the camera’s reproduced color, while the vertical rectangle is the ideal. The inner square approximates how the camera’s produced tone might appear following color correction.
The same information is again displayed in a more linear graph below. The squares depict the colors produced by the PowerShot A520, while the circles represent the ideal. The line linking the two expresses the degree of error for that particular tone – the greater the distance between the related shapes, the less accurate the camera’s reproduction of that tone.
The A520 performed remarkably well on our color tests. Most rendered tones were "spot on" the standard, with the only variance in #4 ("foliage"), #9 ("moderate red"), #17 ("magenta"), #15 ("red"), #7 ("orange"), and #12 ("orange yellow"). This is impressive because all of the colors that stray from the ideal seem consciously designed that way. Most camera engineers understand that a majority of people are drawn to vibrant images that do not necessarily look realistic but seem to have an idealized quality. To cater to this appeal, most camera designers embellish red and pink hues to smooth out "skin tones" as well as some green values to glorify landscapes. Referring to the chart above, it appears that all of the A520’s produced colors that stray from the ideal are related to portraiture or scenery shots and the rest of the color values are nearly perfect. This color orientation is sure to satiate most snapshooters and is as strong as any sub-$300 camera I have seen.
**Still Life Scene **
Below is a shot of our cutting-edge still life scene photographed with the Canon PowerShot A520.
[
Click on the above image to view a full resolution version (CAUTION: the linked file is very large!)](https://reviewed.usatoday.com/cameras/viewer.php?picture=A520-StillLife-LG.jpg )
Resolution*(2.69)
*The A520 is advertised by Canon with 4.3 total megapixels on the camera’s 1/2.5-inch CCD, 4.0 of which are effective for imaging. To test resolution of the A520’s imaging sensor, we record an abundance of images of an ISO resolution chart and import the results into Imatest Imaging Software. The shots are taken under controlled lighting, at various focal lengths and aperture settings, with the camera’s highest score reported. The scores are reported as both literal pixel count and a percentage of the advertised resolution. When this is conducted, cameras that score beyond 70 percent of their marketed resolution are deemed "good," while those exceeding 80 percent are viewed as "very good." Cameras that exceed 90 percent are "excellent" and quite rare.
[
Click on the above chart to view full res. image](https://reviewed.usatoday.com/cameras/viewer.php?picture=A520-ResCH-LG.jpg)
While the A520 did not prove itself a rarity, it performed just shy of the "good" plateau, capturing images with 69 percent of its marketed capabilities or 2.69 active megapixels. This is a decent score when contrasted with other similarly priced models and should not deter users from purchasing the camera unless large prints are sought. Users should feel confident making 8 x 10 prints with the A520 so long as no cropping is going to be done. If larger prints are desired, consumers will have to shell out more than $300.
Noise – Auto ISO*(6.76)
*While the A520 does offer a hefty selection of manual controls, many users will still likely rely on the Automatic setting. We test the auto ISO setting for noise under studio lights exceeding 400 lux of illumination. In this test, the A520 produced images that were remarkably clean. Perhaps surprising to some, the A520 earned a relatively high 6.76 auto ISO score but still fell well short of the PowerShot A510’s 9.6 auto noise score. The two cameras are virtually identical other than their sensors; the A520 contains a 1/2.5-inch 4.2 megapixel CCD sensor, while the A510 has a 1/2.5-inch 3.2 megapixel CCD. While many consumers shop for resolution, the truth is, it can often work against image quality.
Resolution is measuring definition and sharpness; however, noise is not necessarily a variable in that equation but does significantly impact image quality. Think of the difference between a 7.2 megapixel compact camera and a 6.1 megapixel DSLR; while the compact camera contains more resolution, the DSLR will consistently produce higher quality images. The reason for this is that the DSLR contains pixels on the sensor, resulting in far less noise. This is why many 7 megapixel compact cameras have such difficulty with noise at higher ISO settings. Therefore, the A520 should present more of an appeal to users who want printing flexibility and the opportunity to crop their images. For those who are going to be printing small and are more concerned with clean images with increased quality, they should opt for the A510.
**Noise – Manual ISO ***(3.77)
*Continuing with noise evaluations, the A520 contains the same sensitivity options as the less expensive A510. Both cameras offer Auto, 50, 100, 200, and 400 ISO options and both have the same size imaging sensor. The A510 earned a 6.0 overall manual ISO score when each sensitivity option was tested for noise. In all likelihood, the A520 won’t reach that mark, but hopefully will perform similarly.
To test this, we took a series of images of our GretagMacbeth color chart at each available ISO setting and imported the results into a regression analysis to determine an overall noise score. The chart below expresses the results, with the noise levels graphed on the vertical Y-axis, while the available ISO settings are plotted on the horizontal X-axis.
The A520’s performance was a bit surprising, producing images that were significantly more noisy than its less expensive counterpart. Again, some slight reduction in quality was expected; however, the difference was substantial. The A520 earned a 3.77 overall manual noise score with images becoming unavoidably flawed at ISO 200, while the A520 scored a 6.0 overall score and did not become overwhelmingly compromised until the ISO 400 setting. The difference cannot be ignored. Users who are thinking about purchasing a new PowerShot model and are considering upgrading to the A520 because of image quality, think again.
Low Light Performance*(5.5)
*We test the low light capabilities of each camera we review at decreasing light values to observe the camera’s ability to perform at night or in compromised indoor situations. The cameras are tested at 60, 30, 15, and 5 lux to approximate its performance in typical low light conditions; 60 lux appears to the eye as a room might when lit by just 2 small table lamps, while 30 lux is similar illumination to a single 40 watt lightbulb, and 15 and 5 lux provides some insight to the camera’s ability to record in near darkness.
On point-and-shoot cameras, we typically test for low light using the camera’s Auto or Program Auto setting, as this will likely be the mode of preference for the majority of users. Since the A520 fits into an old category of user control within the compact camera market, it is not quite as clear which mode will appeal to the majority of users.
Given the size and price of the A520, we opted to test the camera’s low light capabilities using the PROGRAM Auto setting. While the camera offers a substantial degree of user control, those carrying the camera in their shirt pocket will often just point and shoot. Therefore, we decided to test the sensitivity of the CCD to light using the program auto setting, knowing that those users who want to get more out of the camera will have the option to do so. Thus, unlike our previous tests, these results are NOT the best users can get out of the camera, but rather is measuring what the camera will do without assistance from the user. Users who want better low light images from the A520 can attain them with the camera, but will have to bring along a tripod and set the shutter speed down to 15 seconds, which is also a bit limiting.
******Click on any of the charts above for additional image analysis******
As you can see from the low light images captured with the A520, when set to its Program Auto setting images are not very flattering. The camera’s imaging sensor is not extremely sensitive, so users intent on capturing an elegant night skyline should plan ahead, set the camera on a tripod and use the manual setting to leave the shutter open for as long as is necessary (up to 15 seconds). When set to auto or program mode, the camera will handle 60 lux, but still, image quality is compromised. The colors lose accuracy and become muddy. Noise will be rampant, but unfortunately, that is unavoidable with the A520 when set on its ISO 400 setting. The camera can be manipulated to perform beyond the images above, but not much. If low light images are sought, consumers should look into other alternatives with higher sensitivity options.
**Speed / Timing **
*Start-up to First Shot (7.08)
*The A520 is certainly not up to speed with the current compact camera market, as many manufacturers seem to be emphasizing performance rate among point-and-shoot models as well as higher-end cameras. The A520 retains the DIGIC imaging processor rather than including the DIGIC II which would have made the camera significantly faster. The A520 required nearly three full seconds to start up and capture its first image. Therefore, those eager shooters should have the camera powered up and waiting.
*Shot to Shot Time (9.1) *
The A520 is a bit faster once it is up and running and will record subsequent frames in just less than a second. Unfortunately, there is a limited buffer, so use the limited speed wisely.
*Shutter to Shot Time (7.58) *
Shutter lag is a serious objection for many users, creating a bit of an argument for consumers to stay with film cameras; however, digital manufacturers have taken notice and begun to minimize the delay. The A520 takes just over .71 seconds from the time the user depresses the shutter to the time the image is captured, but this is still pretty slow compared other some point-and-shoot models that require less than .1 second.
Physical Tour
Front*(6.5)
*At the upper right of the A520's front face sits the flash. It is small, and seems to be far too close to the lens. Since it is off-center, it’s likely to throw ugly shadows onto backgrounds. If a camera’s flash is directly above the lens, the shadows cast will fall neatly behind the subjects and out of view. *
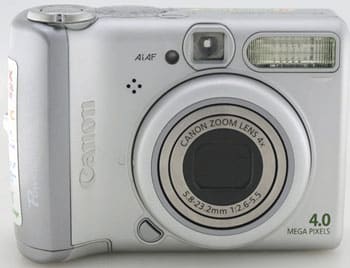
*The lens is mounted in a very large assembly near the center of the front. A removable outer ring around the assembly covers a mount for accessory lenses. At the lower left of the assembly, there is a semicircular button which releases the ring.
There is a very small viewfinder window along the top edge, slightly offset to the left of the lens. It’s a very small window, which probably contributes to the unsatisfactory quality of the viewfinder. To the left of viewfinder, there is a small autofocus illumination light. A cluster of four holes below and to the left of the AiAF lamp covers the microphone. It’s a problematic location, because it's right next to the right hand grip, making it easy for an errant finger to brush against the holes during recording and ruin the sound quality.
A bulge on the far left side forms a hand grip for the user's right hand. There's an end cap on left side of the grip, running vertically up the left side of the frame. It has a darker, glossier finish than the rest of the camera, providing a visual accent. An embossed 'Canon' logo runs vertically up the inboard side of the grip in raised, brushed metal letters, while the model name, PowerShot A520, runs vertically up the left side in white paint. In the lower left corner the camera is labeled '4.0 MEGAPIXELS' in a distinguishable dark green typeface.
Back* (7.0)
*The A520's dominant controls and general interface is concentrated on the back of the camera. The 1.8-inch, 115,000-pixel LCD is on the left, with three control buttons below. From left to right, they are: the Printer/Share button, the MENU button, and the Function/Trash button. The feeble little optical viewfinder sits above the LCD display, flanked on the left by two status lights. The upper one reports the ready status of the camera: steady green means ready to shoot, blinking green means the camera is writing data to memory, steady orange means it's ready to shoot with flash, and blinking orange means the flash is charging, or that camera shake may be a problem at the current exposure. The lower indicator light glows yellow when the camera is in macro mode, and blinks yellow when the camera can't find focus.
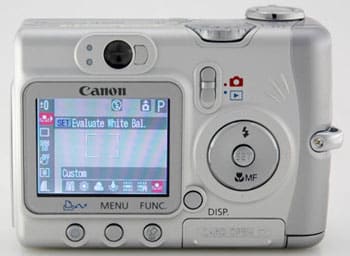
A button to activate the image display is placed at the lower right corner of the LCD. Above and to the right is the dish-shaped four-way controller, which allows navigation on the LCD display. A 'SET' button is centered in the controller. The top of the controller determines the flash mode, and the bottom activates macro focus. A beefy switch above the controller sets the camera to either shooting or review mode.
The door that covers the memory card slot is placed off center to the right and moves down to the camera's base plate.
Just under the spot where the user's right thumb will fall, Canon designers placed three thin ridges to enhance the grip. The contrasting dark grey plastic end cap follows a curve down the right side of the back. The chromed wrist strap lug juts out of the right rear edge of the camera, about halfway up the side. The lug is admirably sturdy, but can get in the user's way when shooting.
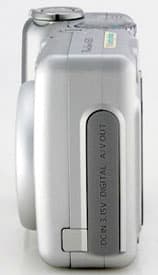
Left Side*(7.5)
*The sides of the PowerShot A520 are spare when compared to the rest of the camera. On the left side, a long flap of gray resilient plastic covers jacks for, from top to bottom, analog A/V out, USB connection with a computer or printer, and a 3.15-volt DC external power supply. Below the jacks, but also protected by the cover, is a small tray for a lithium button battery. Canon calls it the 'Date Battery,' and it supplies power to save the date, time and other camera preference settings during the frequent changes of the AA cells that power the camera's operations.
**
**
****Right Side***(7.5) ***
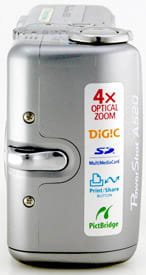
****The right side of the A520 sports the large chrome wrist strap lug. A bit more about that lug - some care was exercised in its design. The shape of its swooping curve that loops outward from the edge is incongruously reminiscent of a duck's head The right side is otherwise punctuated only by two Phillips-head screws, some seams that should mate better, and a (fortunately) removable sticker that touts a few of the camera's features.******
***
Top*(7.0)
The top of the PowerShot A520 is dominated by the shutter release and the control dial. The large chrome-toned shutter release is far to the right, on the hand grip. Pressing the shutter release partway activates the autofocus system. I found it easy to activate the autofocus without accidentally taking a picture. The shutter release is surrounded by a control ring that activates the zoom in shooting mode and the image magnification in picture review mode.*****
***

The Mode dial is also large, making it easy to read and easy to use. It is flush with the top of the camera, a bit to the right of the centerline, but projects beyond the back a bit, right where the user’s thumb lands. The power switch is smaller than the other buttons of the top, nearly flush, and surrounded by a small collar. The button is just about on the centerline of the camera, toward the front.
The left half of the top is smooth. "PowerShot A520" is printed on the surface, and Canon added another gauche sticker, this one touting the camera’s "13 Shooting Modes." Really, it’s gotta go.
At the far right, toward the back edge of the camera, a 3 x 3 matrix of small holes forming the camera’s speaker rounds out the feature set on the top of the PowerShot A520.
Bottom*(6.0)*
Camera designers make the tops and sides engaging and delightful - but they cram all the scars and baggage onto the most obscure surface of the camera, the bottom. The PowerShot A520 carries on this tradition. There are four screw heads awkwardly scattered across the bottom, along with a plastic tripod attachment hole far to the left side. It's generally better to put the tripod mount under a camera's center of gravity, but with a camera this light, it could hardly make a difference. The hole is threaded for a standard 1/4-inch x 20 tripod, and could easily be ruined by over tightening. But PowerShot A520 users probably won't put the camera on a tripod much, which in this case, is a good thing.******
***
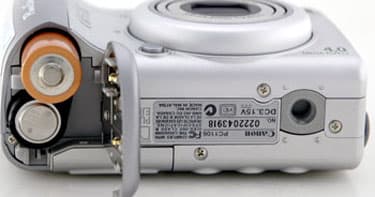
The bottom also features six small bumps that the camera rests on if it's set on a flat surface. The bumps protect a small panel of vaguely-comprehensible text, including the camera's serial number, a legal declaration required by regulators in Canada, and a notice that the camera was made in Malaysia. Two of the bumps are on the face of the battery compartment door, which closes with a secure latch. The latch is an important detail - it's much more durable and secure than the snap fittings on many competing cameras.
Components
**

Viewfinder***(3.5)
*The optical viewfinder on the PowerShot A520 is so puny and useless that it seems purely vestigial. It may resemble other optical viewfinders, but it will not be much help when trying to compose an image. It’s very small, it doesn’t accommodate glasses well, and it’s not accurate. Even though you could save battery power by shutting off the LCD and using the optical viewfinder, it’s more trouble than it’s worth.
LCD Screen*(6.0)*
The PowerShot A520 LCD display is 1.8 inches across the diagonal, with approximately 115,000 pixels. Both numbers should be bigger – this is, after all, essentially the only interface the user has for most shooting. In manual focus mode, not enough pixels are dedicated to the focus area, so even in telephoto, when focus should really snap in and out, it’s hard to tell when you’ve got it right. It’s also

hard to evaluate pictures in playback mode – they’re small, making it difficult to judge sharpness. The color of the screen is also pretty substandard and will not give a very accurate replication of the captured shot.
Many similarly priced cameras now offer 2-inch LCD displays with at least 154,000-pixels of resolution, as most manufacturers are aware of its marketing pull and the extent to which most digital cameras users rely on it. However, as it is with computers, the screen on a camera is one of the most expensive parts to manufacturer and additional screen size and capabilities would likely boost the price of the A520 substantially.
**
Flash***(6.5)
*First, the positive – The PowerShot A520 provides five selectable flash settings: Auto with red-eye reduction, Auto, Flash on with red-eye reduction, Flash on, and Flash off. In addition, the A520 offers a separate manual control of the amount of light the flash puts out, allowing the user to balance the flash illumination with the existing light in the scene. It’s a nice feature that’s common and well-used on pro cameras.
Now, the negative - The flash on the PowerShot A520 is awfully close to the lens, which means it is likely to produce "red-eye," the peculiar glow caused by reflections off the retinas of subjects with relatively dilated pupils. There are two ways to avoid red-eye: move the light source away from the lens, or get the subjects pupils to shrink before taking the picture. Of the two, separating the light and the lens works better. Many cameras have flashes that flip up, away from the lens for that reason. Unfortunately, those little flash arms are often delicate, which might explain why Canon went with the other red-eye reduction method on the A520.
The A520 flash goes off twice in red-eye reduction mode – once just to get the subject’s pupils to shrink, and then again a second later, to take the picture. The problem is many people find the double flash annoying and objectionable. More so, it means the photographer will have to hold the shutter release about a second before you want the picture taken, and that can be tough to time properly.
The A520’s flash is also set to the side of the lens, rather than directly above it. This arrangement causes ugly shadows to one side of the subject. When the flash is directly above the lens, the shadows will fall behind the subject, and will not be visible in the picture.
Zoom Lens*(7.0)
*The A520’s 4x optical zoom lens has a moderate range, spanning 35-140mm (35mm equivalency). This moves from a slight wide angle to a telephoto that’s long enough for portraits, but not long enough for most sports. Unfortunately, with the limited wide angle capabilities, users will have to back up significantly to get everybody sitting at the picnic table into the picture. An additional 3.6x digital zoom is also available when needed, but as always, it is certainly not recommended as image quality will wane exponentially.

Users who are comfortable with 35mm cameras would say the lens is comparable to a 35-140mm lens. At the wide angle end, it has an impressive maximum aperture of f/2.6, which means it can be used in relatively darker places than some other lenses. The maximum aperture slips to f/5.5 at the telephoto end of the range, and the low-light advantage disappears.
Photographers who are familiar with aperture settings on film cameras might note that those cameras have much smaller apertures than f/8.0, the A520’s minimum aperture. Many lenses for 35mm cameras have minimum apertures of f/22, and lenses for larger cameras may have minimum apertures as small as f/64. Lenses on compact digital cameras can't close down that small because the lenses start out so small. F/22 on the PowerShot's lens would be functionally a pinhole, and would produce images about as well as a pinhole.
Design / Layout
Model Design / Appearance*(7.0)
*A520 retains the basic styling of previous PowerShot 'A' series cameras, but has been ergonomically refined into a smaller, more efficient package. Aesthetically, the A520 has a rectangular profile, with a two-tone satin-metallic finish, accented with circular buttons. The camera is a bit thicker than many recent compact releases, but benefits substantially from the weight reduction. The camera's overall styling is certainly compact and easily portable, while containing a hint of substance. However, there are aspects of the camera's fit and finish that leave a little to be desired - the adjoining seams around the frame aren't entirely even, and the battery compartment door rocks back and forth a bit, even when it's latched. A gentle squeeze - what users will give it when they haul it from an overstuffed bag - elicits creaks and groans. Additionally, the plastic parts that make up the shell of the camera show faint ridges that are artifacts of the manufacturing process. They don't affect the strength or durability of the camera, but they detract from the sleek lines and refined look of the design.
Size / Portability*(7.0)
*The PowerShot A520 is average in size among comparably-spec’d cameras, although it is significantly smaller and lighter than its predecessor. The restructured A520 dropped 13% off the previous A85’s frame and trimmed away 20% of its mass. The modified body extends 3.6 x 2.5 x 1.5 inches and weighs 6.3 ounces. Canon also reconfigured the camera's power supply, making this camera require just 2 AA batteries, rather than the 4 it took to power the A85.
The A520 is designed to be thrown in a pocket, purse, or backpack, and while the camera will fit most shirt pockets, it will cause a bit of a sag. The camera is probably more suitable for a coat pocket than a shirt or pants pocket, but nonetheless, it can be stowed somewhere in the user’s garments rather than a separate bag.
When the camera shuts off, the lens retracts and is covered by a retractable lens cap. This will help protect the camera’s main optical element and will compress the frame into a travel-friendly rectilinear form. The controls are nearly flush with the surface of the camera, so they aren’t likely to snag on clothing or any other object in a crowded bag, pocket, or backpack.
Handling Ability*(7.0)
*The A520 is small, which is great when you’re storing it or carrying it, but not quite as beneficial to usage and handling. The camera's primary grip for the user's right hand is a bit small when contrasted with some of the larger ultra-zoom models on the market, but remains in line with cameras of a similar styling. When handling the A520, I found that not all my fingers would fit on the grip, and there wasn’t an obvious place to put them. The options for the left hand are more limited, with only the top and bottom of the camera to act as reasonable resting places - thumb below and index finger on top. This feels awkward, but seems to have become the de facto grip for point-and-shoot digital camera users. This is a bit dangerous though; significantly increasing the potential for the user's left index finger to stray in front of the flash and ruin the image. Those who have never experienced this delightful phenomenon, may never know the joy of watching a brilliant, glowing red radiate through their as the flash discharges. Otherwise, the camera's relative thickness and simplified overall layout make the camera easy to control; however, the lack of any rubber or grip on the surface of the camera other than the embossed Canon logo will make for some substantial shooting challenges in any photographic situation ensuing after the user's hands have gotten wet.
Control Button / Dial Positioning / Size*(6.5)
*Canon found a nice balance between good button size and spacious layout, proving adequate spacing to all essential controls on this relatively small camera. The large dials and selection of buttons take up a substantial amount of real estate on the back of the camera, but it does not feel overly cluttered or hard to use. Still, there is very little vacant space on the back of the camera.
The shutter release on the PowerShot A520 is a large, smooth chrome disk near the camera's front face, with the zoom control revolving around it. The zoom ring has a small bump toward the front to guide the finger. This one certainly comes down to personal preference, as many users seem to be adamantly opposed to placing the zoom toggle around the shutter because it slows down shooting time and takes away the opportunity to take an instantaneous exposure when altering focal length. This is not an issue when the zoom is placed on the back of the camera, as users can then change the focal length with their thumb and are free to capture the exposure with their index finger when the moment emerges. For others, the duel functionality simplifies the process and makes it easier to control the camera with a single hand.
*
*The A520's mode dial is large and recessed into the top of the camera, flush with the frame. There is a slight overhang at the back edge of the mode dial, which is surprisingly enough to access the control; however, the notched dial itself is rigid and difficult to move. This helps to reduce the potential for accidental alteration of the mode, but may be a little more tedious than most users would like.
The four-way controller on the back of the camera is also large, with a "SET" button in its center. As users become more familiar with the camera and accustomed to the layout, it’s likely that these controls will feel natural fairly quickly. Digital cameras which can use a color LCD as both a viewfinder and a display for reviewing the pictures have to be manually switched between shooting and review mode. The A520 utilizes a bidirectional switch for this particular function. The action is a bit tough to move, but it seems pretty durable. Oddly, the switch is significantly larger than most of the buttons on the camera and seems somewhat out of proportion.
One of the camera's more interesting design features is the on/off control, placed alongside the mode dial and pretty much flush with the top of the camera. The button has a collar around it to prevent the camera from accidentally turning on while in a bag or pocket; however, it is only a button and the right sort of bump could obviously turn the camera on. But it's still more resilient than most on/off buttons. I find it a bit odd that Canon decided to make the power control a depressible button and the shooting/review control a switch. Wouldn't it have made far more sense to have it be the other way around?
**
Menu*(7.0)
*To help simplify the interface and break up the long list of settings available to users of the A520, Canon has grouped the various options into two menu categories. Shooting settings that directly impact the image are placed under the "Function" menu, accessible by pressing the FUNC. button, while more generalized settings are placed under the more traditional "Menu" heading.
The FUNC. button will bring up major shooting controls that will shape the recorded image. These include: Exposure Compensation, White Balance, Drive Mode, ISO or Sensitivity, Digital Effects, Metering, and Image Size/Quality or Compression. These options are superimposed over the live feed image and allow users to preview the potential alterations prior to rendering the selection. The various Func. headings are represented by intuitive graphics and are listed vertically along the left margin of the frame, while the corresponding options are placed along the bottom. Users can scroll through the various settings with the up and down portions of the directional disk, while the options are controlled with the left and right segments. The Func. menu is clean and easily discernible. A light grey, translucent border is placed around the options to help distinguish them from the displayed scene.
The Menu options are consistent with Canon’s EOS and PowerShot models in terms of interface and design; however, the A520 and PowerShot models in general group the options in three vertical columns, rather than one long, continuous listing. This is done both for simplification purposes and because of the camera’s lack of professional processing speed.
The menu backdrop is a light shade of grey with a small square box of options overlaid in the center. Each setting is placed in a row, with alternating color values between a charcoal and a mid-grey tone to visually separate settings. The options are listed in white and are represented with both icons and text. The four-tone design effectively organizes the dense menu and help increase visibility, even in bright lighting.
The options that appear when the Menu button is pressed depend on the mode the camera is in (Shooting mode, Video mode, or Playback mode), and each mode’s menu has further submenus, each with an extensive array of options. The menus in all three modes have a few submenus in common, such as the Setup and My Camera submenus. Options in Setup include: Mute, Volume (letting the user adjust individual camera sounds), Power saving (providing the option of automatic camera shutdown after a certain predetermined period), Date/Time, Format (to ready memory cards), File No. Reset (to reset the camera’s internal counter), Auto Rotate, Distance Units (feet or meters?), Video System (NTSC or PAL?), and Language (English, German, French, Dutch, Danish , Finnish, Italian, Norwegian, Swedish, Spanish, Simplified Chinese, Russian, Portuguese, Greek, Polish, Czech, Hungarian, Turkish, Traditional Chinese, Korean, and Japanese.)
My Camera submenu settings control the look and sound of the A520's interface. The first control sets the background image that shows when the camera starts up -- The in-camera choices are a blank screen, the Canon logo on a blue gradient, the Canon logo on a space scene, and a bird in a tree. The camera control software for Windows or Macintosh offers about 41 more choices, and the option to upload an image from the user's computer.
The sound settings are similarly flexible. It's possible to set sounds for starting up, pressing any of the buttons except the shutter release, the shutter release sound, and the self-timer. Any of these choices can be made silent, or set to a simple beep, an odd ray gun sound, or a bird chirping. The provided computer software offers about 40 more choices which have more than a hint of whimsy: are several animal noises, a couple of Kabuki actors, a ray gun sound, and ice cubes clinking in a glass. The software also offers the option of recording new ones.
The Shooting mode has a Record submenu with the following options: AiAF (to allow the camera to select from its nine AF zones), Red-eye (to turn on the red-eye reduction lamp), AF-Assist Beam (to turn it on or off), Digital Zoom, Date Stamp, Review (to adjust the length of time recently captured shots are displayed), and MF-Point Zoom, which magnifies the center of the frame on the LCD display when the camera is set to manual focus. The idea is to aid manual focusing, but the zoom is of such poor quality that it really doesn't help. The Video mode also has a Record submenu, but the only item under the record heading is the control to turn the autofocus assist light on or off.
Lastly, the Playback Mode offers a Play submenu. Options here are: Protect, Rotate, Sound Memo, Erase All, Auto Play (essentially a slide show option), Print Order (which allows the user to set up printing information), and Transfer Order (which selects images to transfer when the camera is connected to a computer).
**
Ease of Use* (7.0) *
The PowerShot A520 offers clear, straightforward controls. They are logically labeled, and Canon exercised considerable restraint in leaving out useless and distracting spec padding. However, in terms of beginner cameras, many competing models do a bit more handholding than the A520 does. On some cameras, menus offer explanations of the options available, as if the camera was engineered to have no learning curve at all.
That’s not Canon’s strategy with the A520. Given the level of manual control available, the target user for the A520 is someone who either already has some expertise in photography, or someone who will spend a bit of time learning the camera’s functions and grow into the camera. Herein lies true value for beginners intrigued with digital photography - even completely inexperienced beginners can use the camera right out of the box on full Auto mode. Users can then gradually and incrementally increase their control, up through the full Manual mode, even learning about applying accessory lens and flash units. This will enable users to learn the medium, while constantly photographing along the way.
Modes
Auto Mode*(7.5)
*The Canon PowerShot A520 provides a range of modes with varying degrees of control. Users who prefer the hands-off approach can switch the A520 into the full AUTO mode, and enable the camera to automate all elements of exposure and most settings. In AUTO, the camera controls the aperture, shutter speed, ISO, autofocus and white balance. The user can still use the zoom control to frame the picture, turn red-eye reduction on or off, turn on the self timer, and adjust file size and quality.
In terms of performance, the A520 proved itself to be reliable in most aspects. The A520 seemed to have a strong metering sensor and pleasantly engaged the flash setting only when necessary, which is surprisingly uncommon for compact digital cameras. Additionally, when tested in profuse lighting, the camera defaulted to the lowest ISO setting and produced clean images with flush tones.
Movie Mode*(4.5)
*The movie mode on the A520 is far from a replacement for a camcorder. Then again, no still camera is (yet?). The two general parameters for video are frame resolution (how many pixels) and frame rate (how mane frames per second). At its maximum resolution, 640 x 480, the A520 shoots only 10 frames per second, well short of the approximately 30 frames per second you’re used to seeing on television. Motion looks quite jerky in this mode. At the camera’s lower resolutions, 320 x 240 and 160 x 120, the frame rate is increased slightly to 15 frames per second, though the image quality is very limited. At maximum resolution, the camera will shoot 30 seconds of video, and at the lower resolutions, it will shoot up to three minutes. However, if a substantial amount of video is going to be recorded with this camera, a large memory card is essential.
Although no digital cameras can parallel camcorders yet in terms of video quality, many far exceed the A520’s limited movie mode.
Drive / Burst Mode*(7.0)
*The A520 offers a burst mode for capturing images in rapid succession. In what Canon calls "Continuous Shooting Mode," the camera can take up to 1.9 pictures a second for up to eight pictures. That’s not fast enough to study a golf swing, but it’s still handy. To compare, the Sony DSC-W5 offers 1.6 frames a second for nine images, while the Casio Exilim does not offer a burst mode at all, so the A520 is competitive in this function.
Playback Mode*(7.5)
*The PowerShot A520 plays back images on either its own LCD screen, or, via an A/V cable, on a television. When the camera is switched from shooting to Playback the last image shot appears on the display. The right and left buttons on the four-way controller will scroll through the various recorded frames, which appear in the order they were captured. In playback mode, the zoom toggle will control magnification, and switch to a thumbnail display of nine images at a time. The user can navigate through the small images and select one. Turning the zoom control toward telephoto (more close up) displays the selected image alone. The zoom control can increase the magnification so the user can inspect small areas of the image. When the display is zoomed in, the controller buttons scroll across the image. To move to the next image, the user presses the SET button, and then the controller buttons.
Custom Image Presets* (8.0)*
The PowerShot A520 offers 13 preset image modes, which set many of the controls on the camera to the appropriate settings for specific types of shots. The 13 presets are: Portrait (blurs the background to make the subject stand out better); Landscape (for distant scenes); Night Scene (for people in front of landscapes at night); Fast Shutter (for stopping action with a short shutter speed); Slow shutter (for accentuating motion with a long shutter speed); Foliage (which brightens color); Snow (which keeps snow from looking too blue, and keeps people in snowy scenes from looking unnaturally dark); Beach (which keeps subjects from looking too dark in bright beach light); Fireworks (for photographing fireworks displays); Underwater (which improves color for underwater photos), although Canon warns that the A520 is not waterproof, and shouldn’t be used underwater unless it is in the WP-DC60 waterproof case; Indoor (which tries to maintain natural color, limit camera shake, and use flash only when necessary); Kids and Pets (which is adapted for fast-moving subjects); and Night Snapshot (which allows taking pictures of people against dark or nighttime backgrounds). The 13 available presets is not quite in line with some other point-and-shoot oriented cameras released this year which approach or exceed 20 preset options; however, those cameras do not offer the range of exposure modes that is available on the A520.
Control Options
**Manual Control Options
**The manual controls on the PowerShot A520 couldn't be better - there isn't anything users are locked out of. Few cameras in this class offer this level of manual control so conveniently. Using the A520, users can set white balance, aperture, shutter speed, and ISO.
The manual mode is as accessible as the more automated, snapshooter-friendly modes most users will more commonly engage. When the mode dial on top of the camera is set to M, the exposure settings appear on the LCD screen. The left and right buttons on the four-way controller operate the aperture, or, after the SET button is pressed, the shutter speed. For a compact camera, it's a convenient setup.
The A520 also offers aperture-priority and shutter-priority exposure modes, which allow the user to set either the aperture or the shutter, while automating the overall exposure.
Focus*
*Auto Focus (8.0)
The A520 offers a pretty sophisticated autofocus system. It's capable of evaluating focus in nine different areas of the frame, and it indicates which of the nine are in focus. When the camera is set to 'AiAF,' the camera evaluates all nine sites for focus, and decides which of the nine should be the priority. When AiAF is turned off, the camera focuses on whatever is in the center of the frame.
In practice, the A520 snaps into focus quickly and accurately, using either AiAF or standard modes. AiAF performed well in my testing, and would be extremely useful for snapshooting. In either AiAF or standard mode, holding the shutter release down halfway will lock the focus.
*
*Manual Focus (5.0)
Manual focus on the Canon PowerShot A520 is available in every shooting mode except AUTO and 'Stitch Assist' mode. It's easy to activate manual focus; when the camera is ready to shoot, pressing the bottom of the multifunction dial once puts the camera in close-up mode, and a second press puts it in manual focus. Then, pressing the right and left sides of the dial focuses the lens on closer and more distant subjects. Manual focus runs continuously from close-up through normal distances.
Metering*(7.5)
*The PowerShot A520 offers Program, Aperture Priority (Av), Shutter Priority (Tv), and full manual modes, and in those modes, the user can choose three meter patterns, which determine what parts of the image get metered and how the readings from various parts are evaluated.
With the Spot pattern, the camera measures light in only the center of the frame. It’s useful for subjects posed in front of a background that’s either much lighter or darker than the subject. The Center-weighted pattern measures the whole image, but places an emphasis on the center of the image. The Evaluative pattern measures light in several segments of the image, and then attempts to figure out which portions of the image are most important. The Evaluative pattern works well, usually realizing that very bright patches in the upper corners of an image are probably sky or other light sources, and directs the emphasis to other parts of the image.
Exposure*(7.0)
*The PowerShot A520’s exposure compensation control allows users to lighten or darken images in the typical +/-2 EV range, moving in 1/3-stop increments. It’s often useful if the camera’s light meter is fooled. The feature is easily accessible, coming up by default when the "FUNC." is pressed; however, it is not available in AUTO mode or full Manual.
The A520 also includes a range of exposure modes to select from, enabling users to determine the amount of control they wish to have over the image. These include Manual, Auto, Program, Shutter Priority, and Aperture Priority settings.
White Balance*(7.5)
*The PowerShot A520 offers both fully automatic and custom white balance settings, in addition to five preset options. The five presets are: Daylight, Cloudy, Tungsten (lightbulbs), Fluorescent, (for warm-white, cool-white or warm-white three-wavelength) and Fluorescent H (for daylight fluorescent and daylight fluorescent-type three-wavelength). In Auto white balance mode, the camera chooses from the presets. To set a custom white balance, the user calls up the Custom setting, points the camera at a white object, and presses the SET button.
While five preset options is not an overwhelming selection (it would be nice to have a setting for shade, for instance, and it’s useful to have two tungsten settings, one for dim lights and one for bright) the custom setting should compensate when proper color calibration is sought. Anybody fussy enough, like me, to want two tungsten settings wouldn’t mind setting a custom white balance.
The white balance setting is automated in AUTO and Scene modes.
ISO*(7.5)
*The PowerShot A520 offers ISO settings of 50, 100, 200 and 400, and AUTO. The lower settings, 50 and 100, offer better quality, but require lots of light. 200 and 400 are lower quality, but allow shooting in darker places without flash, or with flash but of more distant subjects. The A520's ISO range is typical of cameras in its class, but the low ISO 50 rating should help ensure that clear images are attained in extremely bright lighting.
Shutter Speed*(7.0)
*Manual shutter speeds run from 15 seconds to 1/2000 of a second. That’s a reasonable range for cameras of this type -- 1/2000 is standard at the quick end, and the long end ranges from 2 to 30 seconds. Extending the range wouldn’t add to the camera’s usefulness.
Aperture*(7.0)
*The PowerShot A520 has an aperture range from f/2.6 to f/8.0. The automated modes and the manual mode can adjust the lens through that entire range. Aperture is related to the size of the lens opening, and it controls how much light gets through the lens.
Image Parameters
Picture Quality / Size Options*(7.5)
*The PowerShot A520 offers four size settings and three quality settings. The settings are accessible via the FUNC. button. The sizes are: 2272 x 1704 pixels, 1600 x 1200 pixels, 1024 x 768, and 640 x 480 pixels. The camera offers three levels of quality, which Canon refers to as compression. The compression or quality settings are "Superfine" "Fine" and "Normal."
The A520 offers three sizes for movies, but not varying quality. The sizes are 640 x 480, 320 x 240, and 160 x 120.
Picture Effects Mode*(7.5)
The PowerShot A520 offers five picture effects. They are: Vivid (increases color and contrast); Neutral (tones down color and contrast); Low sharpening (softens the edges of subject matter); Sepia (tints the image brownish); and B/W (which creates monochromatic, black and white images). Relatively few cameras have more practical effects than this, though some pack in some that are far more exotic. In general, the more outlandish an effect, the faster people get tired of it. ***
Connectivity / Extras
Connectivity
Software (7.0)
I can’t remember the last time I was pleased and surprised by the software included with a camera, so it’s a delight to say that Canon has included software with both an appealing interface and some unusual and useful features.
Canon’s ZoomBrowser EX (for Windows) or ImageBrowser (for Mac OSX) allow users to sort images, touch up color a bit, crop them, make slide shows, email images and print them. You can print several images on a single page, enlarging and shrinking them individually. The programs also print index pages, jamming lots of images and their filenames on a single sheet. They make it easy to open a selected image in another, more capable, editing program such as Photoshop. The feature sets so far is solid, and they are well-executed, but what really gets me is the "Time Tunnel" interface in the Mac software.
The Time Tunnel takes advantage of the fact that most people, certainly most snapshooters, organize their images by date. If you’re looking for a particular image in a large collection, it’s likely that if you look at any given image in that set, you’ll be able to say whether you took that one before or after you took the one you’re looking for. Rather than creating an interface that just scrolls up and down, Time Tunnel offers a three-dimensional effect. Its window shows several rectangles of decreasing sizes all centered in the screen, and suggesting a vanishing point in the middle. The images are displayed along the edges of each rectangle. The images on the bigger, outer rectangles are largest. The images on the smaller rectangles toward the middle of screen get proportionately smaller. The controller interface looks like a jog dial – slide the cursor up, and the rectangles and images on them are animated – they get larger and spread out, until they leave the frame. At the same time, new boxes and images appear in the center of the frame, too small to read at first, but growing as they go. Slide the cursor down, and the reverse happens. It’s actually a refreshing and intuitive interface. It seemed to be a bit faster to search than a standard window that scrolls vertically, but it could be that it just seemed that way, because it’s more enjoyable.
Both the Macintosh and the Windows software packages also include PhotoStitch software, which assembles panoramic images from mosaic of overlapping images. It’s particularly useful for landscapes that spread wider than a camera can take in. Think the Grand Canyon, Machu Picchu, the Great Wall of China, the Valley of Kings, Victoria Falls, or Graceland.
To use PhotoStitch to create a single picture that embraces the whole of someplace like that, the user takes several pictures of the scene, all from one spot, but turning slightly for each picture, so that the pictures, if laid side by side, would show the entire vista. The software melds the images together to produce a single image. The system works best if the images overlap significantly. The camera offers a special setting for shooting the individual pictures, apparently tagging them somehow with information the software can use. The software is not just for horizontal panoramas. It will combine images both horizontally and vertically. Because the software can’t always handle images in a convincing way, it offers a means of editing the seams between pictures. There are more powerful programs for stitching images, but PhotoStitch is fun. It’s likely to suit A520 users who have an itch to make a panorama.
*Jacks, Ports, Plugs (6.0) *
The A520 sports a USB port, an A/V port for display on televisions (it offers both NTSC format for US televisions and PAL for most other places), and a jack for an AC adapter, which is not included with the camera. The AC adapter would most likely be useful for folks who plan to run slide shows on a television.
*Direct Print Options (7.0)
*The PowerShot A520 is PictBridge and DPOF compatible, which means that no computer is necessary to make prints. PictBridge and DPOF are industry standards for photo printing, so it’s likely that any printer or photo lab that can handle digital files will be able to handle pictures from an A520. The camera can flag individual images or groups of images for printing, indicate the number of copies to be printed, specify that an index print be made, and indicate that both full-size prints and index prints be made. These data are written onto the memory card, and can be used with or without the camera – they’ll work if you simply slide the card into a printer with an SD card slot, or if your photo finisher downloads you files.
The A520 does not offer in-camera cropping and editing, as some cameras now do.
*Battery (5.0) *
The PowerShot A520 requires two AA batteries. Though Canon supplies the camera with standard alkaline cells, the manual says rechargeable NiMH batteries are recommended. Trust the manual – the included batteries didn’t last more than an hour or two during testing. Testing is definitely more taxing than regular operation, but digital cameras still use lots of power. Get a couple sets of batteries, whatever camera you use. Although it’s typical for cameras in this price range to use standard AA cells, many more elaborate digital cameras have proprietary batteries that typically last far longer than AAs between recharges. Battery life may be a reason to consider a more expensive camera than the A520.
*Memory (4.0)
*The A520 does not have memory built-in, but it comes with a 16MB MMC card. The camera accepts SD/MMC cards, and most users will find a couple more cards useful. The 16MB card will only hold seven images at the camera’s maximum quality setting.
**Other Features ***(6.0)*
Tethered Mode - Windows and Macintosh computers can remotely operate the shutter of the PowerShot A520 via the USB connection. While this feature is pretty common on professional-level digital SLRs, it’s unusual on a consumer camera like the A520 and provides users the opportunity to snag all sorts of creative shots from the home computer--if you've got a long enough cable and place you’re A520 intelligently, you could get a shot of the neighborhood skunk tipping over the garbage cans or the eggs in a bird's nest hatching, for example. Using this setup, the user can control most camera settings, including focus exposure, zoom, resolution and flash, and it shows a live display of the LCD viewfinder.
Self-Timer - The A520’s self-timer can be sent to a range of delays from two to ten seconds. It also allows the user to set the camera to wait from zero to ten seconds, and then take from one to ten pictures.
Auxiliary Lenses – Though they are not included in the A520 kit, Canon’s auxiliary lenses add to the camera’s capability and appeal. The wide angle lens changes the camera’s widest angle of view from a 35mm lens equivalent to a 25mm, which is a significant change. The telephoto lens takes the camera from 140mm equivalent to a 240mm. Without image stabilization, the telephoto adapter is a bit less useful – in many circumstances, a lens that powerful is hard to hold steady. The third lens, a close-up attachment, lets the camera focus on subjects as close as 1.6 inches from the lens. I didn’t evaluate these lenses, so I cannot speak about their performance; however, the potential to augment the perspective is invaluable to most photographers and should increase the camera's appeal.
Auxiliary Flash – Canon also sells an external flash for the A520. The HF-DC1 is more powerful than the built-in flash. It comes with a bracket which holds it side-by-side with the camera. There is no electrical connection between the flash and the camera, however. The HF-DC1 is a "slave" flash, which fires when its sensor detects another flash going off. Canon warns that it might go off when other cameras flash near the A520, so it could be a bit unmanageable in a crowd – at a wedding or graduation, for instance.
Overall Impressions
Value* (7.5)
The PowerShot A520 competes in a crowded area of the digital camera market – an abundance of cameras are available for between $250 and $300, with many of them offering a variety of very strong automatic modes. The A520 is an attractive, small camera. Its particular advantages in this field are its 4x, rather than 3x, zoom, its excellent software, and its complete and easy-to-use manual controls in exposure and white balance. If you are seeking that level of control, the camera might be the strongest value available; however, if your preferences lean towards a competent movie mode, visible LCD screen, and internal memory, the A520 won't do you much good.
*
Comparisons**
Sony Cyber-shot DSC-S90 - The Sony DSC-S90 lists for $300, and sells for about $40 less online, just about the same price as the A520. Its significant advantage over the A520 is a 2.5-inch LCD. That’s much bigger than the A520’s 1.8-inch LCD, but size is the only advantage – they’re both 115,000 pixels. It may be easier to read the menus on the large Sony screen, but the display is not any sharper or more detailed. The S90's zoom has a 3x optical range, shorter than the A520’s 4x. The Canon zoom is better at both ends – it goes a bit wider than the Sony, and offers significantly more telephoto. The other significant difference between the two models lies in the type of shooting they are optimized for; the Sony offers far greater video recording capabilities, but does not have the manual controls available on the A520.
Sony Cyber-shot DSC-W5 - The Sony DSC-W5 lists for $350, well above the A520’s $300 list price. Its online price is also around $50 higher. The primary advantage to the Cyber-shot DSC-W5 is the added resolution - it’s a 5-megapixel camera, so its pictures ought to be a bit sharper when printed as an 8 x 10 or larger. The W5 has the same 2.5-inch, 115,000 pixel LCD as the S90 mentioned above, which again, will offer a bit more in the way of visibility, but certainly not clarity. Frame wise, the DSC-W5 and the A520 are essentially the same size, although the Sony W5 is almost an ounce heavier. This will offer far more in the way of durability, but does sacrifice something in the way of portability.
Nikon Coolpix 5900 - The 5900 has a suggested list price of $350, but is available online for as little as $270, just about what the A520 costs. The Nikon 5900 is a 5-megapixel camera, which should yield sharper enlargements. The 5900 has a 2-inch LCD, again with only 115,000 pixels. Like the Sony DSC-W5, the 5900 has a 3x zoom, rather than a 4x. The body of the 5900 is about the same size as the Canon A520, but it’s about two ounces lighter. The 5900’s video mode can record at 30 frames per second, which is far superior to the A520's movie mode.
Kodak DX7440 -For about $50 less than the A520, this Kodak entry level model offers the same resolution, the same zoom range, and a significantly better, 2.2-inch, 154,000-pixel LCD display. It comes with a lithium-ion rechargeable battery, which should last much longer and be much more convenient that the NiMH AA’s that the A520 needs (but doesn’t come with). The DX7440's ISO range tops out at 800, twice as high as the A520 and will enable it to functional in far less light. The DX7440 also includes 32MB of internal storage. Not only does the A520 lack internal memory altogether, but the DX7440's built-in storage is twice as much as the 16MB MMC card Canon included with the A520. The DX7440 also accepts SD/MMC cards. The DX7440 lacks a bit in terms of image control compared to the A520, offering just four settings for white balance, with no custom setting, but it does offer a manual exposure mode, as well as aperture- and shutter-priority modes.
**Who It’s For **
Point-and-Shooters - The A520 can take very good snapshots, and its controls are clear and uncluttered, enough so that most snapshooters would find it easy to use. There are an awful lot of features on this camera that point-and-shooters won’t use, so their dollars might be better spent on a camera that offers them unique features suited to their needs – built-in memory, more handholding from the menus or even smaller size.
*Budget Consumers - *Snapshooters on a budget could spend less and get less – a shorter zoom, limited white balance settings, and less manual control. On the other hand, users who want manual settings for everything probably won't find this level of control in any less expensive camera.
Gadget Freaks - Don’t you think most gadget freaks would love to operate their cameras from their computers? They already own the 45-foot USB cables. That feature simply calls to them. Throw in some accessory lenses and manual options and watch the Gadget freaks descend.
Manual Control Freaks - Manual control is without question the distinguishing characteristic of the A520. The A520 is capable of offering many control features inherent to DSLRs with the simplified interface of a compact model. While true control freaks probably are not too concerned with simplification, there might be a little freak in a lot of compact users that do not have the financial means to make the jump into the DSLR realm.
*Pros/Serious Hobbyists -*There are a fair number of serious photographers who like to carry a small, cheap camera everywhere they go, the way a writer might carry a notebook, or a painter a sketchbook. They want to be able to take a picture whenever they find an interesting subject, but they need a camera that they can control. The A520 could be that sort of camera.
Conclusion
**** ****
**Conclusion
**With a 1/2.5-inch 4.0 megapixel CCD, 4x optical zoom lens, and full range of exposure modes, the A520 has a lot to offer consumers for less than $300. While there is significant competition within this price bracket, the manual controls are what set the A520 apart from the rest. The typical features touted within this segment of the market - large LCD, long battery life, internal memory, and strong movie mode - are relatively void on the A520. Rather, Canon has opted to cater to a niche demographic of compact camera consumers and design a camera that appeals to those seeking a portable sub-$300 alternative with extensive control. For those users, the A520 will provide custom settings, manual control, accessory flash and lens alternatives, and can even shoot with the camera tethered to a computer. If manual control appeals to you, there really is no greater value out there in this price range.
Specs
Specs Table
{{manufacturer_specs_table}}{{raw_scores_table}}
Meet the tester
Patrick Singleton
Editor
Patrick Singleton is a valued contributor to the Reviewed.com family of sites.
Checking our work.
Our team is here for one purpose: to help you buy the best stuff and love what you own. Our writers, editors, and lab technicians obsess over the products we cover to make sure you're confident and satisfied. Have a different opinion about something we recommend? Email us and we'll compare notes.
Shoot us an email