
Introduction
Product Tour
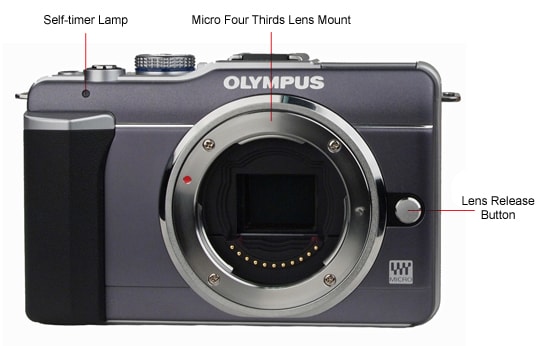
The 12.3-megapixel E-PL1 is available in three colors; silver, black and blue (shown here). It is sold in kit form, with a 14-42mm f/3.5-5.6 zoom lens that retracts for easy portability.
Front
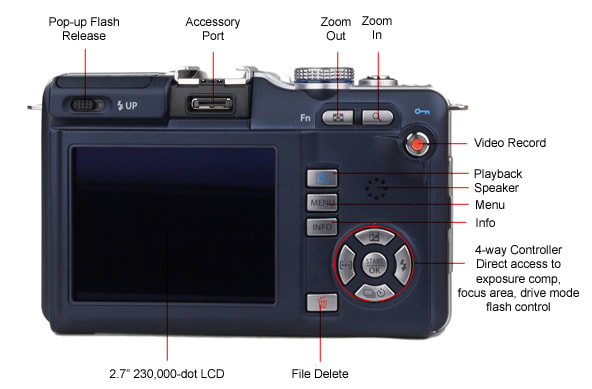
Back
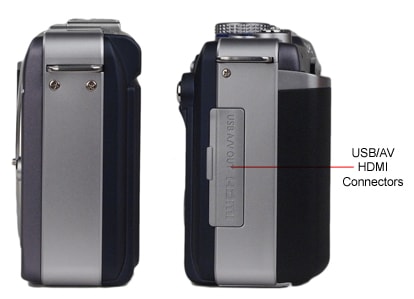
Sides
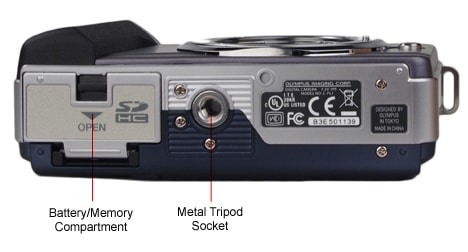
Bottom
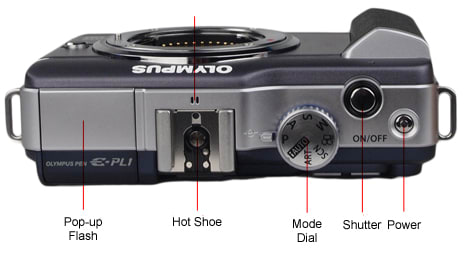
Top
**Size Comparisons **
**In the Box **
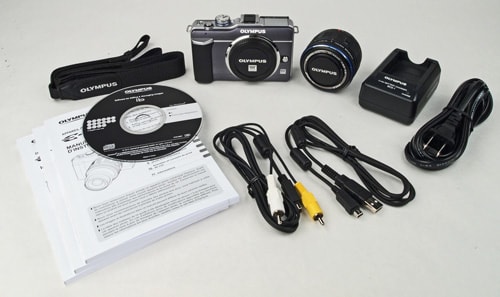
• Camera with body cap
• BLS-1 Lithium-ion rechargeable battery
• BCS1 battery charger
• CB-USB6 USB cable
• CB-AVC3 AV cable
• Neck strap
Color
**Color Accuracy ***(14.55) *
While the E-PL1 couldn't match the stand-out color accuracy of its more expensive brand mate, the Olympus E-P1, it did handle both tint and saturation very well. The natural color mode was the most accurate, and was used as the basis for our scoring, but it's worth noting that the portrait and muted modes also produced very low overall color error readings. Click here for more on how we test color.
In natural mode, saturation was a reasonable 97%. Only the vivid mode was significantly oversaturated, at an appropriate 110%. Dark skin tones, purplish blue, orange yellow and magenta were reproduced with particular accuracy in natural mode, while bluish green, purple and vivid yellow were particularly off-hue.
NOTE: Because of the way computer monitors reproduce colors, the images above do not exactly match the originals found on the chart or in the captured images. The chart should be used to judge the relative color shift, not the absolute captured colors.
As shown in the following score comparison chart, the E-PL1 fared well in our color accuracy testing against some stiff competition — the D5000 and E-P1 are two of the strongest cameras we've tested in this area.
Color Modes*(4.00)*
There are five straightforward picture modes; vivid, natural, muted, portrait and monotone (i.e., black and white). There is also an i-Enhance setting that analyzes the image, picks out the predominant colors and emphasizes them to produce a more dramatic effect. Finally, there's a custom setting that lets you tinker with the settings for any of the provided pictures modes and save the results for future use. The available variables include contrast, sharpness, saturation and gradation, which is the Olympus term for dynamic range adjustment.
The following chart includes same-size samples taken from our test shots in each color mode.
NOTE: Because of the way computer monitors reproduce colors, the images above do not exactly match the originals found on the chart or in the captured images. The chart should be used to judge the relative color shift, not the absolute captured colors.
Long Exposure*(7.30)*
In our long exposure testing, we measure both color accuracy and image noise at shutter speeds from one second to 30 seconds, under low light. The Olympus E-PL1 image noise results were very close to those found with other Micro Four Thirds cameras we've tested, including the Olympus E-P1 and the Panasonic GF1, all of which are notably higher than the Nikon D5000 and Samsung NX10, both of which use larger APS-C format sensors. For color accuracy, the E-PL1 color error is pretty high across the range of shutter speeds, though not as far off as the Panasonic GF1. Click here for more on how we test long exposure.
Shooting in the most accurate faithful mode, color error under low light is significantly higher than in our bright light testing. Saturation, though, remains nearly the same under both shooting conditions.
The long exposure noise reduction system actually resulted in noisier images across most shutter speeds. This is not that unusual and, if you think about how this type of processing works, not surprising. With long exposure noise reduction enabled, the camera takes a shot with the shutter open and then takes a second shot with the shutter closed. It then analyzes the noise pattern in the second, dark exposure and tries to mathematically eliminate that pattern from the actual exposure. Problem is, noise is inherently random, so the patterns in the two shots are unlikely to match unless there's some consistent flaw in the sensor. It's rare that we see this type of processing produce any significant gain, and in this case we'd leave it off entirely for low-light shooting.
The two cameras with APS-C sensor basically clobbered the Micro Four Thirds models in this test.
Noise
Noise*(5.62)*
We expect to find problems with high image noise in Micro Four Thirds cameras, with their smaller sensor size leading to smaller photo receptors and more electrical crosstalk, and the E-PL1 followed the pattern. It did score a bit higher here than the Olympus E-P1 and Panasonic GF1, though, a pleasing result from a less expensive model. Click here for more on how we test noise.
We test for image noise by shooting a brightly lit X-Rite ColorChecker chart with high ISO noise reduction turned off, and at each available noise reduction level setting (in this case, low, standard and high). As seen in the chart, noise levels start out below 1% with noise reduction turned off (to preserve maximum fine detail levels), but results are barely usable by the time you hit ISO 800, and hopeless after that. Cranking up the noise reduction level has a substantial effect, but as seen in the sample high ISO images seen here, you pay a considerable price in lost detail at anything beyond the standard level. Considering the trade-off, your choice of setting will ultimately be guided by what you're shooting (is there much detail to lose?), and how you're planning to display the shot (a small image viewed on-screen can survive a lot more abuse than an 11x14' print)..
Occasionally one component of the total image noise will be notably higher than the others, making noise much more apparent to the eye. That's not the case here: the red, green, blue, yellow and chroma (grey) noise levels are tightly grouped.
With noise reduction turned off to maximize image detail, the Olympus E-PL1 noise levels become problematic at ISO 800, and severe beyond that. The Nikon and Samsung cameras, with their larger APS-C sensors, delivered far superior results.
Raising the noise reduction level to the maximum reduced image noise system dramatically, particularly at low ISO settings. And looking at our sample images, we find acceptable loss of detail when shooting with noise reduction cranked up.
Overall, the E-PL1 delivered slightly lower image noise levels than the other Micro Four Thirds cameras, but if noise is a key concern for you, the true SLRs are far and away a better choice.
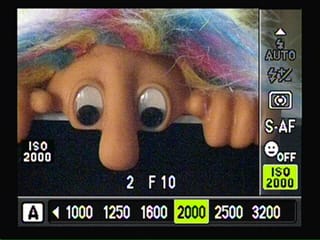
ISO*(5.50)*
The ISO settings range from 100-3200. There is also an Auto ISO function, which will make the setting automatically based on lighting conditions. The user can set an upper limit to the auto ISO, and a default value.
We don't see a lot of ISO bracketing around these parts, but it's provided in the E-PL1. In a three-shot sequence, the ISO value is raised and lowered from the current setting by 0.3, 0.7 or 1.0 EV.
NOTE: The images above are not used in our testing or scoring, but are included here to show real-world examples of the differences between cameras at the various ISO settings.
Resolution
Resolution*(14.60)*
The E-PL1 absolutely nailed our resolution testing, with exceptional image sharpness. We base our tests on the highest quality JPEG images the camera can produce, and there's no question that aggressive sharpening is a factor in the results here. Looking at the actual test images, though, there is little evidence of oversharpening artifacts to mar this impressive performance. Click here for more on how we test resolution.
Distortion
We don't include distortion results in our scoring for interchangeable lens cameras, but we do measure it. Shooting with the 14-42mm kit lens (the same collapsible lens offered with the Olympus E-P1 and E-P2), we found very low distortion at the maximum and mid-range zoom settings. At the widest setting, we measured 1.82% barrel distortion, which is certainly acceptable.
Chromatic Aberration (7.99)
*There was*some visible chromatic aberration, most noticeably at the widest lens setting, but it's not a major problem.*
*
Sharpness (17.44)
Sharpness scores for the E-PL1 far exceeded any of the other cameras in our test group, with measurements of 2026 lw/ph horizontally and 2284 lw/ph vertically at the center of the lens at the widest setting.
The following charts show same-size crops taken from our test images, which are shot at three distances, and three aperture settings at each distance.
Sharpness suffers here with the lens stopped down to f/22, but outside of this extreme results are very good. As expected, chromatic aberration is most visible at the widest lens setting.
The softness at f/22 is less noticeable here, with lower chromatic aberration. And at the other apertures results are tack-sharp from edge to edge.
There's a trace of chromatic aberration, but overall sharpness holds up very well with the lens at its full telephoto setting.
The graph below shows a substantial win in this category for the E-PL1.
Picture Quality & Size Options*(12.60)*
The E-PL1 offers a choice of medium and low resolution settings when shooting in the 4:3 aspect ratio.
There are four JPEG compression settings: Super Fine (compressed at 1/2.7), Fine (1/4), Normal (1/8) and Basic (1/12). RAW files are recorded in the Olympus ORF format at full 4032 x 3024 resolution no matter what the aspect ratio setting, with the aspect ratio selection saved along with the image. when shooting RAW+JPEG, any of the four JPEG compression settings are available.
Dynamic Range*(4.15)*
The dynamic range problems we found with the Olympus E-P1 continue here; in fact, the E-PL1 had slightly less success maintaining detail in the bright and dark areas of high-contrast images than its predecessor. Click here for more on how we test dynamic range.
The E-PL1 started out with a mediocre five-stop range at its lowest ISO setting, which narrowed quickly and dramatically as the ISO level increased.
The chart below shows dynamic range performance at ISO 200 for our comparison cameras. The E-PL1 results are nearly identical to those produced by the E-P1, which is not a good sign. An interesting oddity here is that the Samsung NX10, which uses an APS-C sensor, scored nearly as badly here as the Micro Four Thirds models.
Taking dynamic range performance across the entire ISO range into account, the E-PL1 received the lowest score in our comparison group.
Image Stabilization*(6.30)*
We test the effectiveness of image stabilization systems by mounting the camera in a computer-controlled rig that produces repeatedable movement patterns and shooting a test chart at a range of shutter speeds, first with a low level of shake, then with a high level. In the case of the E-PL1, the in-camera stabilzation didn't have much effect when the camera wasn't moving much, but produced substantially sharper images at all tested shutter speeds when the camera was shaken more aggressively. Click here for more on how we test image stabilization.
In addition to simply turning image stabilization on and off, you can select I.S. 2 mode, which only compensates for vertical shake to ensure smooth horizontal panning, or I.S. 3, which dampens horizontal shake when panning vertically. If you're not shooting with a Micro Four Thirds lens, you can manually enter focal length information to tune image stabilization performance.
As seen in the chart below, the E-PL1 image stabilization system stacks up well against the other cameras in our comparison group, with only its brand mate E-P1 posting superior results.
The following table offers a visual key to the effect of image stabilization, with representative same-size crops from our test images.
*NOTE: As of May 2010 we have revised our image stabilization testing procedure to consider only horizontal stabilization. The scores shown here are up to date.
*
White Balance
White Balance*(5.75)*
We were disappointed with the inaccuracy of the E-PL1 white balance system, given the strong performance of the E-P1 here. We expect to find problems when the automatic white balance system encounters tungsten light bulbs, and the E-PL1 was no exception, but it proved less accurate under daylight than any of the comparison cameras, and not much better under fluorescents. And while taking a custom white balance reading produced better-looking photos (particularly under incandescents), the white balance is still less accurate than we expect to see. Click here for more on how we test white balance.
Automatic White Balance (8.46)
The automatic white balance setting underperformed when compared to the other tested cameras.
Daylight isn't usually much of an auto WB challenge, but the E-PL1 found difficulties even here.
Incandescent lighting often produces orange-hued photos when shooting with auto WB. The E-PL1 results here are bad, though the Nikon D5000 and Samsung NX10 were even worse under these lighting conditions.
The color reproduction under compact white fluorescent lighting using automatic white balance isn't awful, but the E-PL1 still trails all but the totally flummoxed Nikon D5000 in our comparison group.
Custom White Balance (3.04)
Take a custom white balance reading and your indoor photos taken with incandescent lighting improve dramatically. Under fluorescent and daylight illumination, though,the expected level of improvement didn't materialize.
As shown below, the E-PL1 underperformed the pack in white balance accuracy.
White Balance Settings*(9.50)*
The E-PL1 offers eight white balance presets, including three types of fluorescent illumination.
White balance settings are reflected in the Live View image on screen, so you can see the effect of changes made using the live control or super control panel as you make them. Fine adjustments can also be made to any white balance setting (auto, preset or custom) via the custom menu. In this case, the Live View display isn't active, but you can take a preview image (by pressing the movie button) and see the results of your fiddling without leaving the adjustment screen.
If you set the display to multi view, you can see previews of four potential white balance settings at once, scrolling through your options before committing.
The procedure for taking a custom white balance reading is straightforward. With the live control menu cursor on one-touch white balance, pressing the INFO button brings up the setting screen. Point at a grey or white surface, press the shutter button and you're done.
White balance bracketing is available, with three images recorded from a single shot, with increments of 2, 4 or 6 steps set separately for the amber-blue and green-magenta axes.
Sample Photos
Sample Photos
Clicking on the large images below will open the full-size originals in separate windows.
Still Life Examples
This table offers shots of our still life taken which each of the comparison cameras, at all numeric ISO settings. Clicking on any of the thumbnails here will open the full-size image in a separate window.
NOTE: The images above are not used in our testing or scoring, but are included here to show real-world examples of the differences between cameras at the various ISO settings.
Noise Examples
This table includes same-size crops taken from our still life shots, with each comparison camera at all standard ISO settings.
NOTE: The images above are not used in our testing or scoring, but are included here to show real-world examples of the differences between cameras at the various ISO settings.
Playback
Playback Mode*(11.25)*
There is a rich assortment of image views available, though the manual isn't much help in figuring out how to access them all. There's no mention of the need to turn certain display choices on or off via the setup menu, and when you do tackle the menu, there are choices that only trial and error will unravel. Took me a good long time, for example, to figure out that the light box display is only available when the magnification system is set to Mode 2. It's far more complicated than it should be, clearly, but at least the options you unlock have genuine value.
Movie playback offers the full set of useful features: you can fast forward and rewind, use single-frame advance or rewind after pausing, jump to the beginning or end of a clip and adjust the volume.
The slide show options are more extensive than most, including background music if you want it, the option to include stills and movies or only one type of file and, if you are including movies, whether to show the entire clip or just the opening section.
Files can be erased individually, in a group or all at once. They can also be set to protected status, in which case only formatting the card (or removing the protection) will get rid of them.
In-Camera Editing*(9.25)*
The generosity in providing multiple playback views contrasts with the stinginess of available in-camera editing options. With JPEGs, you can resize, rotate, crop and change the aspect ratio, create black and white or sepia copies, fix red-eye and use shadow adjust to brighten a backlit subject. There's also an e-Portrait option that 'makes the skin look smooth and translucent,' according to the manual. In our trial run, it blurred blemishes and facial lines a bit while adding image noise — nobody said beauty comes cheap.
JPEG copies of RAW images can be saved, applying the current camera settings, which is a fairly clumsy way of handling this task.
The one fun editing feature is the image overlay function, which lets you combine up to three RAW files to create a composite image, with control over the relative brightness (gain) of each. Saving the result as a RAW file lets you add even more images to your composition.
There is no movie editing or trimming option, so you're stuck with that inevitable jerky camera movement that happens when you press the button to start and stop recording a clip.
You can also record an audio snippet (up to 30 seconds) and store it with a photo. This can be useful if you want to audibly 'jot down' information about your photo (the address where it was shot, for example), though it would be even better if you had the option to make the recording while taking the picture.
Software*(4.00)*
The E-PL1 ships with a new piece of Windows software, inscrutably called 'ib'. It offers some surprising options when it comes to organizing your photo collection, including geotagging, event labeling and facial recognition to automatically identify folks in your photos and tag them for easy searching. However, other than the ability to straighten an image and correct for lens distortion, the editing features are limited (especially for RAW file development), and the user interface is flashy, but confusing.
No Mac software is provided with the camera.
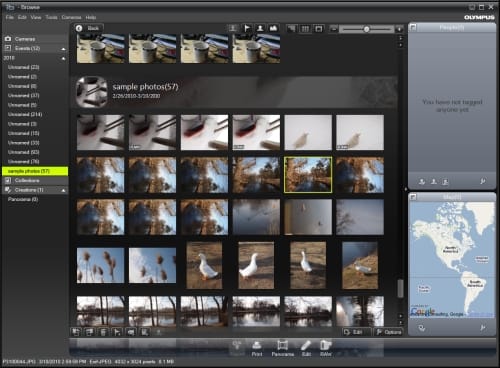
The oddly named ib software is strong on organization, weak on editing.
Direct Print Options*(4.00)*
The E-PL1 offers sophisticated options for printing directly from the camera, without using a computer.
The PictBridge system, which outputs directly to a compatible USB-connected printer, offers two options. The Easy Print version lets you simply display a photo on the camera screen and print out a copy.For more detailed control, Custom Printing lets you print all the stored photos or select those you'd like, set the number of copies per image, choose bordered or borderless prints, have multiple photos printed on a sheet or paper, and have the date, time and file name printed. You can also trim an image within the PictBridge utility, and generate an index print with thumbnails of all your shots.
The DPOF system, which lets you store a file on your memory card with printing instructions for an outside service bureau, lets you choose to print all files on the card or individually select the ones you want, choose print quantities and indicate whether you want the shooting date or time printed.
Hardware
Sensor*(2.00)*
The E-PL1 uses a Four Thirds format sensor with a gross resolution of 13,060,000 pixels and an effective resolution of 12,300,000 pixels. As with other Micro Four Thirds cameras we've tested, the small sensor size compared to the APS-C sensor used in most digital SLRs is a mixed blessing, allowing smaller camera design (particularly when measuring the depth), but ramping up image noise.
The sensor-shaking dust reduction function kicks in every time you turn the camera on.
Viewfinder*(0.00)*
The E-PL1 doesn't come with an electronic viewfinder, but it does have an accessory slot for mounting the optional VF-2 EVF (a pricey $280 accessory). The good news here is that the EVF display is bright and clear, even in low light, and keeps up well as you move the camera, without the smearing and stuttering we sometimes see. The eyepiece can be angled freely up to 90 degrees, which is fortunate — when left flat, it's very difficult to hold comfortably without the camera mashing into your nose. Of course, your nasal protuberance may be more forgiving, but we found a 45 degree angle was the best bet. If needed, you can make a a diopter adjustment by turning a ring around the eyecup.
The EVF shows the same information as the LCD and, also like the LCD, can be adjusted for brightness and color temperature.There's no sensor to automatically switch between the two displays when you hold the camera to your eye. Instead, you press a button positioned under the eyecup.
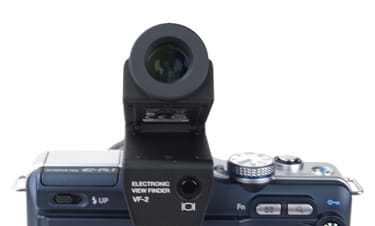
*The optional EVF works well, but is costs
about half as much as the camera itself.*
LCD*(4.65)*
The LCD is a bit small, at 2.7 inches, with an ordinary 230,000-dot resolution. The image gets a little grainy and flickers a bit in low light, but updates smoothly under any lighting conditions, stands up to bright sunlight well. Overall, a perfectly adequate display, but lacking the visual snap of the OLED screen on Samsung's NX10, or the higher-res 3-inch LCD on the Panasonic GF1.
LCD brightness and color temperature can both be adjusted manually, with 15 available settings for each. There is also an optional Live View Boost feature to adjust brightness automatically.
LCD Panel
The monochrome information display panel found on higher-end SLRs is understandably lacking here.
Flash*(7.75)*
Olympus literally saw the light with the E-PL1, added a pop-up flash to its Micro Four Thirds line for the first time (the better to compete with Panasonic's similarly equipped GF1). The flash is small, but it pops up a good distance from the lens on a nicely designed hinged arm, and fires a decent burst of light for its size (Olympus puts the guide number at 7 at ISO 100). What's impressive is the even coverage we found in our flash shots, with only a slightly hot spot in the middle.
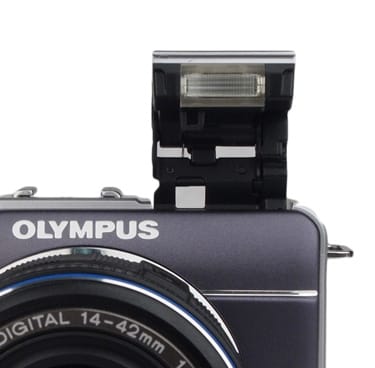
*The small pop-up flash produces surprisingly
even coverage.*
The pop-up flash won't pop up on its own when shooting in auto mode; you have to raise it manually using the switch on the camera back. We prefer this system to cameras that take it upon themselves to raise the flash and fire, causing potentially problems in flash-free environments.
Flash output can also be adjusted manually, to full, 1/4, 1/16 or 1/64 power. And when shooting with the standard flash modes, you can adjust the intensity in a ±3 range.
Flash bracketing is an option, with a three-shot sequence and 0.3, 0.7 or 1.0 EV increments.
With compatible external flash units, the E-PL1 can control three units independently.
Lens Mount*(0.00)*
The Micro Four Thirds lens introductions are still slow in coming; Olympus is limited to the 14-42mm kit zoom, a 17mm pancake, and the recently introduced 9-18mm f/4.0-5.6 ($699.99). A 14-150mm f/4.0-5.6 will ship soon, priced at $599.99. The E-PL1 is also compatible with Panasonic's Adapters are available to mount other lens formats to the camera, but this inevitably leads to reduced communication between camera and lens, with resulting loss of key features, and some focus slowly because they were not designed with a contrast-detect system in mind.
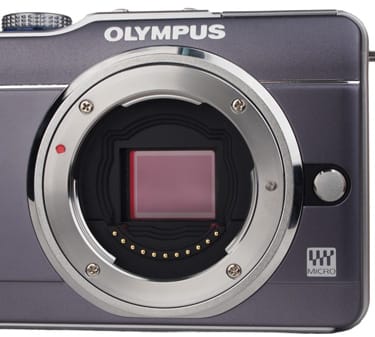
*The Micro Four Thirds lens mount is narrower
than an SLR mount to save space.*
The makers of compact mirrorless cameras like to boast about how small they are compared to SLRs — but then you stick a protruding zoom lens on the body and your dreams of pocket-size portability grind to an abrupt halt. Olympus tackled this problem with an ingenious collapsible zoom lens design on the 14-42mm. By holding a sliding switch to one side while turning the lens barrel, the front element retracts, cutting about an inch and a quarter from the overall depth. The camera still won't squeeze into a pants pocket, but a jacket pocket is a practical possibility.
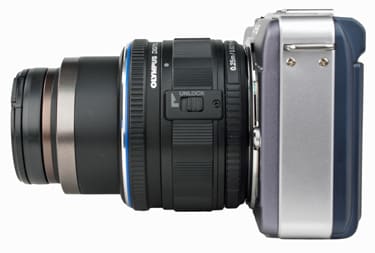
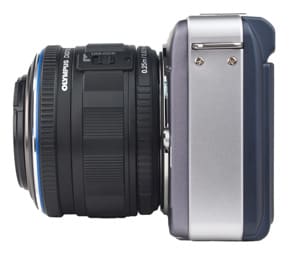
*It's easy to give this zoom lens a nose job.
*
There's a 2x apparent magnification when compared to 35mm lenses, so the 14-42mm functions like a 28-84mm on a 35mm camera. This is a reasonable range, providing decent wide-angle coverage and a medium zoom that works for portraits. The shots below are samples taken across the zoom range, standing in the same spot.
Peripheral illumination correction, called Shading Compensation here, is available to digitally compensate for vignetting in the corners.
Battery*(6.00)*
The E-PL1 is powers by a BLS-1 rechargeable Lithium ion battery (the same one used in the E-P1 and E-P2). Olympus claims will take 290 shots measured by CIPA standards; we'd say this is slightly, but not wildly optimistic. An extra battery lists for $60, sells for $38 on Amazon, and seems like a good investment, especially when it's small enough to carry easily.
Olympus estimates a full charge will take about three and a half hours.
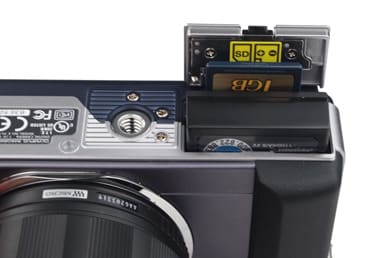
*The battery and memory card share a compartment,
not the best arrangement when shooting on a tripod.*
Memory*(3.00)*
The camera accepts SD and SDHC memory cards, but Olympus doesn't support the higher-capacity SDXC standard yet.
Jacks, Ports & Plugs*(4.50)*
There are two I/O connectors under a plastic door that closes tightly but works poorly; it has a plastic hinge that won't open completely, and feels like it will break if bent back too often. Inside is an Olympus proprietary connector for standard-def video (with mono audio) and USB data. Below that is a mini HDMI port for connecting directly to a high-def TV.

Standard mini HDMI, non-standard USB/AV.
Controls
Shooting Modes*(13.00)*
The move from using a dial control on previous PEN cameras to relying exclusively on the four-way controller takes its toll when it comes to making adjustments while shooting. Adjusting program shift, aperture value in aperture-priority mode, and shutter speed value in shutter-priority mode requires pressing up and down on the four-way controller buttons. Pressing up, though, also triggers exposure compensation, with values changed by using the left and right buttons. And pressing down is the shortcut for setting the drive and self-timer mode.
Take a deep breath and follow along with just one example of how this gets ugly. You want to shoot in shutter-priority mode. You turn the mode dial and the current shutter speed and aperture values appear on screen. You press the down button on the four-way to lower the shutter speed value — d'oh! The drive mode control pops up on the screen (since that's the default command for that bottom button). Backing out of that, you press up on the four-way to engage the shutter speed adjustment, and can then press down to lower the shutter speed... only, in the process, you've also engaged exposure compensation mode (the default value of the top four-way button), whose values are changed by pressing side to side on the four-way. And, if you actually take a picture using a particular shutter speed setting and want to lower it again — yep, you first have to press up on the controller before pressing it down. Can all this be done without a master's degree? Yes. Is it elegant and intuitive? Not on your life
The new iAUTO live guide system is an interesting way to give less savvy shooters more control over their photos. There's no requirement that you tinker with the settings arrived at by the automatic system, of course; the live guide doesn't even appear on the screen unless you press the START/OK button.
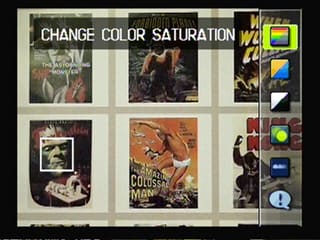
*The live guide offers plain-English image
adjustments when shooting in automatic mode.*
When you do, a slim panel slides out from the right side of the screen offering six options:
As you change settings, the effects are previewed live on-screen, so there's no guesswork required. Live guide is not available when shooting with a flash, though.
As with the E-P1 and E-P2 before it, the E-PL1 offers sophisticated ways to store camera configurations, so you can load a group of settings instead of individually adjusting each one for different shooting conditions. And as before, these options are presenting in a way that's frustrating and confusing.
For starters, in addition to being able to reset the camera to its factory defaults, you can also create two stored configurations and reset to those instead. the The camera can be reset to factory defaults via the first shooting menu, but it can also be set to one of two stored configurations. It isn't hard to do; right on the first shooting menu there's a Custom Reset listing, with the option to store the current camera settings as Reset1 or Reset2, or to apply either one if you've already stored them. Any other camera manufacturer, though, would have called these Custom Settings or Custom Modes. And if they're really good, they let you give them meaningful names (Sports or Indoor, for example), or maybe put them on the mode dial for quick access.
And if the bafflement level hasn't already hit 11, there's another, entirely separate way to accomplish nearly the same thing. This one is called My Mode, and allows you to store a variety of shooting settings as My Mode 1 or My Mode 2. The only way to access the My Mode feature is to assign it to the programmable (and much in demand) Fn button. And to actually use those settings, you have to hold the Fn button down while you press the shutter button. an uncomfortable pincer-like maneuver best undertaken by those with tiny, well muscled hands. It's a powerful concept implemented very badly indeed.
Live View*(3.25)*
The so-so LCD takes some of the pleasure out of Live View shooting, but it's perfectly functional if not aesthetically appealing, standing up to sunny days nicely (especially if you manually boost the brightness). As shown below, there are some interesting display options available while shooting (toggled by pressing the INFO button), though we'd rather be able to keep the expanded information display up as long as we'd like, instead of having it automatically switch to the more basic version after several seconds.
One cool feature from previous PEN cameras, the on-screen level gauge, isn't included in the E-PL1, unfortunately.
Scene Modes*(8.00)*
The extensive scene mode selection is unchanged from the Olympus E-P1 and E-P2:
Olympus again offers half a dozen Art Filters, which are applied during shooting (you'll find samples of all six in the Sample Photos section). Four of the six are familiar from previous cameras: Pop Art, Soft Focus, Grainy Film and Pin Hole. The company retired the Pale & Light Color and Light Tone filters (no great loss), replacing them with Diorama (the increasingly popular miniature effect) and Gentle Sepia. One thing hasn't changed in the Art Filter implementation: you still have no control over the intensity of the effects. You do maintain control over focus area, flash mode and exposure compensation, but ISO is set automatically. And the effect is previewed live on-screen while shooting, which makes them far more practical.
Of these art filters, we find Pop Art is the most useful, and grainy film is tempting in very small doses. The new Gentle Sepia filter is sort of ingenious. Instead of just tinting everything to an orange brown, it identifies black areas and leaves them as is, producing a more attractive effect.
The tricky part of using Art Filters is that they become part of your stored JPEG, leaving you without an unaltered original. The solution is to shoot in RAW+JPEG mode. The filter effect is incorporated in the JPEG version, but the RAW file is available as a straight image.
Picture Effects*(2.00)*
The Olympus Picture Mode system combines color control with contrast, sharpness, gradation (an unusual term for dynamic range adjustment) and saturation. There are six preset picture mode settings, shown below with our samples and Olympus' descriptions:
The i-Enhance option, introduced with the E-P2, bears a bit more explanation. What happens is, the camera analyzes the scene to determine the predominant colors and boosts the saturation only for those shades, leaving the rest of the photo unaffected. The effect is most noticeable if you're shooting a scene with a single strong color presence — a grove of leafy trees, for example, or a row of brick buildings.
In addition to the six presets, you can also create a custom picture mode by altering the parameters of an existing mode. For the color modes, this means adjusting contrast, sharpness and saturation to one of five levels. Gradation can be set to auto, normal, high key or low key. For the i-Enhance mode, the effect can be set to standard, high or low. The monotone mode has different image parameters, combining contrast and sharpness and gradation adjustment with picture tone (neutral, sepia, blue, purple or green) and a virtual black and white filter, in neutral, yellow, orange, red or green. These work like filters used with black and white film: yellow, for example, enhances the white clouds in a blue sky, while green emphasizes red tones and green leaves. The customized settings are retained when you turn the camera off and on, but you can't store more than one customized picture mode.
Two images can be combined using the in-camera multiple exposure capability. If you're shooting two sequential images, the first one is shown on screen as you line up the second, which is a huge help. You can also use an existing shot, stored in RAW format, as one of the two exposures. In addition to letting you keep a bank of component multiple exposure parts on your memory card, this also means you can combine more than two frames in a multiple exposure, by saving a multiple exposure as a RAW file and using that as an overlay for additional images.
While you don't have fine control over the gain level of each image, you can set the camera to auto gain, which sets each image in the combination to 1/2 brightness, or turn auto gain off to use each image at its original brightness.
Focus*(16.00)*
The camera uses eleven autofocus areas, as shown in the diagram below. You can let the camera select one, in All Target mode, or choose one manually using the four-way controller. Since the leftmost button on the four-way is the shortcut for selecting an autofocus area, the process is fast and simple. You can also assign the Fn or movie button to automatically return the AF point to a predetermined target, but this doesn't seem like a particularly compelling use of scarce button resources.
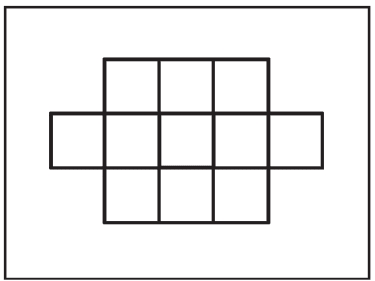
The eleven E-PL1 autofocus areas.
One of the major beefs with the Olympus E-P1 and E-P2 was autofocus speed. Actually 'speed' isn't even the right word, since 'crawl' more accurately reflects the experience. In April, Olympus released a firmware update for the E-PL1 (and the other PEN cameras) that promises to improve autofocus speed by 15%. We updated our review cameras, took it for a test drive and (drum roll please)... found that the update lives up to its promise. Of course, the key question is whether faster is fast enough, and that really depends on what you're shooting. When the lights are low, autofocus performance is still mighty pokey (and there's no autofocus assist lamp to help out). In a normally lit room shooting candids, you're probably going to be alright. Trying to follow the action at a school football game it's hit and miss.Initial focus acquisition time is still going to make you miss out on some key plays. If you know who you're shooting, though, lock on and use the continuous autofocus tracking option, you'll succeed more often than not.
If you turn face detection on, the camera will find a face and focus on it when you're using all target mode. If you've selecting an autofocus target manually, the camera can still use face detect for exposure control, but will focus on the target you've chosen.
Exposure*(4.25)*
Exposure compensation runs a ±3 EV range. By default the increment is 1/3 EV, but this can be changed to 1/2 EV or 1 EV via the setup menu. You can use the multi view display to preview the effects of exposure compensation. The current setting is shown in the top right image, with values above and below shown in the other boxes. The previews are fairly small, but they give a good at-a-glance approximation of the final effect.
Three-shot AE bracketing is provided, with 0.3, 0.7 and 1.0 EV increments.
**
Speed and Timing**
Shot to Shot (3.07)
The E-PL1 delivered what Olympus promises, burst rate shooting at about 3 frames per second, putting it on a par with the E-P1 in the just adequate department.
Drive/Burst Mode (5.50)
There is a single burst mode setting, which Olympus puts at 'approximately 3 frames/sec. for as long as the shutter button is pressed.' Whether we were shooting full-res super-fine JPEGs or RAW files (without attached JPEGs), we found that the buffer filled up after nine or ten shots, slowing progress to a crawl.
Depth of Field Preview*(1.00)*
Depth of field preview is available, as long as you've assigned the programmable Fn button or the movie button to this task.
Metering*(7.00)*
Metering modes can be selected using either the live control or the super control panel. The scene is divided into 324 areas for metering purposes.
There is no dedicated AE lock button on the E-PL1. If you want to lock the exposure, you'll have to assign this function to the Fn or movie button.


The patterns for center-weighted (left) and spot (right) metering
If the camera is set for digital ESP metering and face detection is turned on, the system will find up to eight faces in the scene and adjust exposure accordingly. With other metering settings, even if face detection is on, the selected metering pattern will be used (face detect can still control autofocus).
Shutter Speed*(9.00)*
Shutter speeds range from 1/2000 second to 60 seconds, plus bulb for extended exposures. The fastest shutter speed isn't very fast when compared to most SLRs, which ordinarily offer 1/4000 or 1/8000 second speeds. It's worth noting that the Olympus E-P1 tops out at 1/4000 second.
The Anti-shock mode lets you set a delay (anywhere from 1/8 second to 30 seconds) between the moment you press the shutter button and the moment the photo is taken. This is useful when shooting with a microscope or telescope.
Self-Timer*(2.50)*
There are two self-timer settings but, oddly, no option to have the camera beep as the self-timer ticks down. Not that the sound serves much purpose, since there is a clearly visible lamp blinking at the subject on the front of the camera, but we've come to expect an audible cue too.
Design & Handling
Handling*(8.00)*
The E-PL1 doesn't have the classic retro look or metal body of its PEN predecessors, but it offers a similar comfort level. The camera is light and maneuverable without feeling insubstantial. The right hand grip on the front is a bit shallow for our taste, but curling your middle and ring fingers around it provides a firm handhold, with your index finger positioned appropriately over the shutter. Your thumb rests on a flat space just to the left of the movie record button (right over the speaker, in fact). This looks a bit perilous in the photo, but that record button is actually raised up on a kind of pedestal, making it very unlikely your thumb will drift over and accidentally start shooting.
Controls*(8.25)*
There are significant changes here compared to the E-P1 and E-P2. The vertically mounted control wheel is gone, along with the left hand control dial, with their functions taken over by the four-way controller. It's not a disaster, but it's a notable downgrade, making adjustments slower and less convenient. For manually adjusting shutter speed and aperture priority, the new system is a clumsy kludge, as outlined here. For most operations, though, the trade-offs are acceptable. And we are happy to see the dedicated movie button, especially since it can be programmed to take over some of the functions previously only assignable to the overworked Fn button.
Menu*(7.00)*
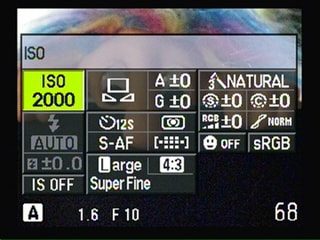
Like the Olympus E-P1 and EP-2, the E-PL1 employs a three-part menu strategy. There's the standard full-screen tabbed menu for infrequently changed settings, a live control menu that overlays the right and bottom screen edges with key settings while shooting, and the enthusiastically named 'super control panel' which overlays the entire Live View screen with shooting settings that can be adjusted.
When shooting stills in program, aperture-priority, shutter-priority manual or iAuto modes, the live control menu (shown below) includes settings for picture mode, white balance, drive mode/self-timer, image stabilization, aspect ratio, image format and size, flash mode, flash compensation, metering mode, autofocus mode, face detection and ISO.
*The live control menu lets you make adjustments
without losing sight of your subject.*
Changes you make to picture mode, white balance, aspect ratio and metering mode are all previewed on-screen, a helpful feature.
The live control and super control panel (see below) are not available in art filter or scene modes.
*The Live Control menu puts controls at your fingertips
without obscuring the on-screen view.
*
While the live control panel puts many settings at your fingertips, there's an even more complete option available. pressing INFO switches from live control to the enthusiastically named super control panel, which covers most of the screen and lets you adjust just about every shooting setting without delving into the main menu system. We found using the super control panel became our main shooting strategy, since it not only let us make lots of adjustments easily, but also showed most of the current camera settings at a glance.
Finally, the full-screen menu system is used for less frequently changed settings, such as image stabilization and bracketing, and for customizing camera operations. There are five menu sections, two for recording, one for playback, one for function customization and one for rarely changed camera settings. the organization isn't bad, but the use of icons instead of text for some choices is potentially confusing, and there are options which aren't visible on-screen until you've scrolled down to reveal them, never a good design choice.
Manual & Learning*(4.00)*
Olympus delivers a 124-page manual that looks fine, has lots of nice charts and diagrams, and gets the basic points across well enough. Unfortunately, the distinctive camera features that may confuse even knowledgeable photographers are given painfully short shrift. There's a camera setting for 'gradation.' What's that, you ask? Here is the user guide explanation, in its entirety: 'Adjust tone (gradation).' (Turns out its dynamic range adjustment processing, but you'd have to be clairvoyant, or talk directly to the folks at Olympus, to have a clue.) The Art Filter system is a concept requiring a bit of explanation — it gets half a bit here. Wondering what that i-Enhance picture mode does? 'Produces more impressive-looking pictures matched to the scene mode.' Adda set of intimidating LCD diagrams in the 'basic' up-front section with 56 callouts between them, inadequate explanations for your playback mode options and a barely-there index and you have a document sorely in need of a skilled editor. To see for yourself, you can download a copy in PDF format here. At least that way, you can use search instead of struggling with the index.
Video Color & Noise
**Video: Color Performance***(5.74)*
The Olympus E-PL1 did not have a good performance in our video color accuracy test, but it did do marginally better than last year's E-P1. The camera measured a color error of 6.1 with a saturation level of 80.42%. Frankly, we expect more accurate color reproduction from a video-capable DSLR camera like the E-PL1. All of our color results come from shooting with the Natural color setting (other color settings are further down in this section). Click here for more on how CamcorderInfo.com tests color performance.
The Color Error Map above shows the E-PL1 rendered red colors most accurately in our video testing (certain blues were also quite accurate), but all other colors were off by quite a bit (particularly greens and yellows). The camera has a number of picture modes (see examples below). None of the alternate modes produced more accurate colors in our testing, with each of them measuring a color error similar to what we got with the Natural setting.
You can see in the comparisons that the two Olympus cameras produced colors in a very similar fashion. The exposure levels for each camera were also nearly identical when shooting in auto mode (hence their images look mostly the same). The Nikon D5000 and Samsung NX10 managed more accurate colors than the two Olympus cams, but the saturation levels for all these models were in the 80% - 90% range.
**Video: Noise Performance***(12.90)*
The E-PL1 averaged a very low amount of noise in our bright light recording, with the camera measuring just 0.2675% noise. This is around what we expect to see from a video-capable DSLR, but it was surprising that the E-PL1 did so much better on this test than last year's E-P1 (0.5175% noise, which isn't a bad score to begin with). Click here for more on how CamcorderInfo.com tests noise performance.
The above crops are excellent for comparing sharpness and detail on the video images captured by each of these cameras. The two Olympus models look like they recorded the sharpest image, but it is tough to say which is the better of the two. We think the E-P1 looks slightly sharper and cleaner along its horizontal trumpet at the bottom of the image), but the two images are very close. The Nikon and Samsung cameras both struggled to capture a sharp image here, with each model producing a blurred image with lots of aliasing. In our actual sharpness test (in the next section of this review) the Samsung and Nikon models did a bit better, however, because we test video sharpness by looking at a video in motion (we pan while we record). In that case, the D5000 and NX10 did just as well as the E-PL1 and E-P1.
Video Motion & Sharpness
Video Low Light Performance
**Video: Low Light Sensitivity***(0.55)*
In our low light sensitivity test, the E-PL1 required 26 lux of light to reach 50 IRE on the waveform monitor. This is more light than was needed by the other cameras we compared the E-PL1 to — including last year's E-P1. Click here for more on how CamcorderInfo.com tests low light sensitivity.
Low light sensitivity does have a lot to do with what kind of lens you are shooting with, so if you attach a faster lens to the E-PL1 you can probably improve the camera's low light performance significantly. The kit lens we did our testing with was not very fast, with its widest aperture setting being f/3.5. Most consumer camcorders have aperture values of around f/1.8 at their widest setting. This lets more light into the lens, thus resulting in better low light performance.
**Video: Low Light Color Performance***(6.34)*
The E-PL1 had better color accuracy in our low light video test than it did in our bright light testing, which is somewhat surprising (last year's E-P1 did the same thing, though). The camera registered a color error of 5.75 and a saturation level of 83.11%. Neither of these numbers are all that impressive, and it should be noted that all the cameras we used as comparisons had better color saturation in our low light testing. Click here for more on how CamcorderInfo.com tests low light color performance.
When you look at the E-PL1's image side-by-side with the E-P1 it is rather hard to notice much of a difference (see below). The Nikon D5000 and the Samsung NX10, on the other hand, produced completely different images than the two Olympus models in our low light testing. The D5000 captured a very bright image in auto mode, which made its colors look a bit bland despite the fact that it had a very high saturation level of 96.84%. With its very dark image, the Samsung NX10 was the opposite of the D5000, although it earned the best color accuracy of the bunch (2.96 color error).
**Video: Low Light Noise Performance***(12.57)*
Low light noise was an area where the E-PL1 did surprisingly well. In our testing, the camera averaged 0.54% noise, which is less than one-quarter the amount of noise we measured on its predecessor, the E-P1. So, it seems like Olympus reduced the noise on the E-PL1, but also lowered the low light sensitivity a bit in comparison to the E-P1. We like the less noisy image overall, which means the E-PL1 is the stronger camcorder when it comes to low light performance. Click here for more on how CamcorderInfo.com tests low light noise performance.
None of these models were all that great in low light, but the E-PL1 produced the most usable image. The E-P1 had too much noise, which you can see on its image above, while the Nikon D5000 produced a bright, yet washed-out image in our low light testing. The Samsung NX10 was arguably the worst camera in low light, despite the fact that it scored well on color accuracy. Its low light image looked very murky with lots of artifacting, color splotches, and blur.
Video Features
**Video: Compression***(6.00)*
Olympus uses the Motion JPEG compression system on the E-PL1 to record HD video. Motion JPEG, or MJPEG, is commonly found on point-and-shoot digital cameras that have video modes. The compression system is very basic and widely compatible with editing software and media players (the E-PL1 saves video files in the .avi format). We're not crazy about MJPEG compression for HD video because we don't feel it can deliver the quality that something like AVCHD compression is capable of.
The E-PL1 has two record modes: an HD option that captures a 1280 x 720 video image and a standard definition setting that records using a 640 x 480 resolution. The maximum record time for a single clip is 7 minutes in HD mode and 14 minutes in the SD mode. File sizes are also limited to 2GB.
**Video: Manual Controls***(6.40)*
We're happy to see Olympus include options for shutter speed control, ISO, aperture, and exposure on the E-PL1's video mode. The camera has far more manual options in video mode than its predecessor, the E-P1 (it only had an aperture-priority mode and exposure control). Unfortunately, none of the manual controls—not even exposure—can be adjusted while recording is taking place. All settings must be made prior to pressing the record button (you can adjust focus manually during recording, however).
You can record video on the E-PL1 in any of the camera's shooting modes. The only mode that allows you to set manual controls for videos, however, is movie mode. If you record in any other mode the camera will revert to automatic settings — even if you've set things like aperture or shutter speed for your photos.
Auto Mode
Since the Olympus E-PL1 isn't a full-fledged DSLR, the camera is able to offer a continual autofocus system. This means the camera can automatically focus during recording without the touch of a button. The focus system isn't fantastic, however, which is what we're accustomed to seeing from Micro Four Thirds cameras that have a live autofocus option. The autofocus is noisy, slow (it can take 2-3 seconds to focus properly), and it occasionally alters the exposure levels and color temperature for a moment while focusing.
The auto exposure system on the E-PL1 is also not a highlight of the camera. When moving from different light levels the camera's auto exposure provides no gradual transition whatsoever. Perhaps some users will like this quick, snap-like exposure change, but it seemed jarring to us.
Zoom Controls and Zoom Ratio
The zoom and zoom controls for the E-PL1 entirely depend on what kind of lens you have attached to the camera. The kit lens is a 14 - 42mm lens, which means it has a 3x optical zoom. The zoom for this lens is adjusted by rotating the large ring on the middle of the lens (the outer ring adjusts focus).
Focus
The E-PL1 has a number of autofocus modes, which we discussed in the Auto Mode section above. You can also set focus manually using the outermost lens ring on the camera. Using manual focus is preferable when recording videos as it doesn't have any of the issues associated with the autofocus system. Manual focus is also one of the few features that can be adjusted while recording is taking place.
Exposure, Aperture, and Shutter Speed
Exposure, aperture, and shutter speed can all be set manually on the E-PL1 in video mode. Exposure can be set manually when the camera is in program or aperture-priority mode. Obviously, aperture can be set in aperture-priority mode, but it can also be set independently from shutter speed in manual mode. Shutter speed can only be set manually in manual mode. The camera offers a good range of aperture, shutter speed, and exposure adjustment — just look at the table above to see the full list of available settings in video mode.
ISO and Other Controls
ISO (which is called 'gain' on camcorders) can also be set manually when the E-PL1 is in manual video mode. The camera doesn't have the same ISO range that is available for its still images, but it still has quite a few options (ranging from ISO 200 to 1600).
The camera also has a few Art modes for recording video, including: Pop Art, Soft Focus, Grainy Film, Pin Hole, Diorama, and Gentle Sepia. These modes differ as to what they do, but many of them allow you to record at very low shutter speeds (like Pin Hole mode). You can adjust exposure manually in each of these modes, but ISO, aperture, and shutter speed cannot be set when using any Art mode.
The E-PL1 has three image stabilization settings in video mode—Auto IS, Vertical IS, and Horizontal IS. We did not test the performance of these stabilization settings for video, but we did test how well the camera's image stabilization worked for taking photos.
The Olympus E-PL1 has a tiny built-in microphone that is mounted on the top of the camera. The mic can record stereo audio, which is a plus, but it also picks up plenty of operational noises when you rotate the lens, use the autofocus system, or press buttons on the back of the camera. As far as audio features go, the E-PL1 doesn't really have any — except for an option to turn audio recording off if you so desire.
Let's face it, if you want clean audio you shouldn't be using the built-in mic on the E-PL1 or any video-capable DSLR. Olympus does offer an external stereo mic that fits into the hot shoe and accessory port ($90), but we did not have the opportunity to test this accessory.
The E-PL1's most obvious perk is its compact size. The camera is far smaller than a traditional DSLR thanks to its Micro Four Thirds format. Even with its small body, however, the camera is rather awkward to use for capturing video. It can be difficult to keep the E-PL1 steady for an extended period of time and you often need two hands to wield the camera properly.
The LCD on the E-PL1 is entirely stationary, which isn't great for shooting video at odd angles. The menu system also isn't that easy to use in video mode, and the fact that the camera has no dials for adjusting aperture or shutter speed is a downer. In addition, we're really miffed that the E-PL1 doesn't let you adjust any manual controls (other than focus and zoom) while recording is taking place.
We do like that the E-PL1 has a dedicated 'record' button for starting and stopping video recording. The button is fairly large and it has a distinctive red dot at its center, which is the universal symbol for video recording. Compared to last year's E-P1, the E-PL1 feels a bit less durable, but it is roughly the same size.
Olympus EP1 Comparison
Performance
The big improvement we found between the older E-P1 and the spanking new E-PL1 was an improvement in sharpness. The E-P1 was fine in this regard, but the E-PL1 is exceptional. Out of the box color accuracy is better with the E-P1, but the noise performance for the E-PL1 is better in two ways. The overall noise score, which considers all noise reduction levels, is superior for the E-=PL1. Equally important, though, is the fact that the E-PL1 loses far less detail when you crank up the high ISO noise reduction processing than the E-P1 does, making it more practical to digitally knock down noise with a severe sharpness penalty. The E-P1 did prove far more accurate in its white balance performance, but we'd rather tweak color reproduction than struggle with fuzzy images.
Components
The all-metal construction of the E-P1 is an attractive and appropriate throwback to an earlier era, which fits with the camera's distinctive retro design. On a practical level, though, the E-PL1 feels solid and well-constructed, even with less 'wow' factor visually. The E-PL1 is the first of the PEN cameras to include a pop-up flash and, while it's not the most powerful strobe on the block, we were impressed with the even coverage it provides; certainly a worthwhile tool to have at hand. The E-PL1 also has an accessory port missing from the E-P1, offering the option to add an admittedly expensive (at $280) but nicely designed electronic viewfinder, or a $90 external stereo mic. The E-P1 screen is slightly larger (3 inches versus 2.7 inches), but the resolution and performance are the same.
Handling
When it comes to comfort, portability and maneuverability, we figure it's pretty much a draw between the two cameras. The difference lies in the two control dials on the E-P1, including a cleverly arranged vertical dial on the far right, which together make manual settings and other adjustments convenient. The E-PL1 relies entirely on a four-way controller, not a big deal when navigating menus, but a royal pain when trying to set aperture or shutter speed manually. On the plus side, you will find a dedicated movie recording button added to the E-PL1, and the fact that it's programmable is a big plus on a camera that has a multitude of functions fighting for a spot on the Fn button.
Controls
There isn't much difference in the camera control options between the two cameras, beyond the surprising choice of a top 1/2000 second top shutter speed for the E-PL1 (the E-P1, like most cameras, goes to 1.4000) and the loss of the on-screen digital level feature found on the E-P1.The exception is video mode, where the E-PL1 offers controls for shutter speed, ISO, aperture and exposure, where the E-PL1 had only aperture-priority mode and exposure control.
NOTE: The images above are not used in our testing or scoring, but are included here to show real-world examples of the differences between cameras at the various ISO settings.
Panasonic GF1 Comparison
Performance
The first question you have to ask when evaluating a Micro Four Thirds camera is, 'How noisy is it?' In this match-up, the Olympus does a slightly better job of keeping the digital speckles in check, though neither can compete with a traditional digital SLR sensor. On the plus side, though, both the E-PL1 and the GF1 handle noise reduction processing far better than the older E-P1, losing far less detail as you raise the high ISO noise reduction levels. Noise levels are close during long exposures as well. The Olympus color reproduction is more accurate, and sharpness when shooting with the kit lens is distinctly higher than for the GF1. The Panasonic does better maintaining detail in high-contrast scenes, and has a far more accurate white balance system.
Components
Both the Olympus E-PL1 and the Panasonic GF1 are distinguished from the older E-P1 by the included pop-up flash and accessory port for attaching an optional electronic viewfinder. The Panasonic has a larger (3 inches vs. 2.7 inches) and noticeably more attractive LCD (460,000-dot vs. 230,000-dot) than the Olympus. The E-PL1 offers in-body image stabilization, where the GF1 requires purchase of stabilized lenses. For video shooting, the E-PL1 can record stereo sound with the $90 add-on mic, where the GF1 is mono-only.
Handling
For size and shape, the two cameras aren't much different, though the collapsible zoom lens does give the Olympus an edge in pocket-porting potential. Both have dedicated movie recording buttons, a nice convenience, but the GF1 also has a well-positioned control dial near the thumb rest, a huge improvement over the four-way-controller-only system on the E-PL1. The Olympus has an edge in its quick menu system, offering both a short version that's similar to the one found on the Panasonic, and the more fully featured super control panel that puts nearly every shooting setting at your fingertips.
Controls
More similarities than differences here, with the same ISO range, top video resolution and burst rate. The two cameras share the same ±3 EV bracketing range, but the Panasonic lets you choose a 3, 5 or 7-shot sequence within that range. It also has a nice add-on in the self-timer department, letting you choose to have three shots taken when the countdown expires (handy if you're racing from behind the camera to be part of a group shot). Both cameras offer depth of field preview, a welcome feature too often left off recent models. With the recent firmware upgrade, the Olympus autofocus speed is more competitive, though we still give a noticeable edge to the Panasonic.
NOTE: The images above are not used in our testing or scoring, but are included here to show real-world examples of the differences between cameras at the various ISO settings.
Nikon D5000 Comparison
Performance
The Nikon D5000 outperforms the Olympus E-PL1 in every lab test but one, including substantially better results in color accuracy, image noise, long exposure, white balance and burst-rate shooting. The one exception is resolution. We were surprised at the mediocre results for the D5000, which contrast with the surprisingly sharp photos taken with the E-PL1.
Components
The Nikon uses an APS-C format sensor, the standard size for most digital SLRs, while the Olympus relies on the Four Thirds sensor, which is about 40% smaller. The smaller sensor means smaller pixels and more crowding, resulting in higher image noise. In other performance areas, the size difference doesn't seem to have much effect.
As a true SLR, the Nikon D5000 offers fast phase-detect autofocus, while the Olympus E-PL1 uses the relatively sluggish contrast-detect system. The D5000 also has an optical viewfinder for eye-level shooting, which delivers a bright field of view and a steadier shooting position than arms-length shooting using the rear LCD on the E-PL1. You can add a very decent electronic viewfinder for eye-level shooting with the E-PL1, but it costs nearly $280. If you're a point-and-shoot upgrade who likes lining up shots using the LCD, then the Olympus is actually a better choice than the Nikon, with faster autofocus than the Nikon Live View system. The Nikon is a stronger choice for shooters who like manual controls, with a control dial for making adjustments that's far more practical than the four-way controller system on the Olympus. And, of course, the selection of Nikon SLR lenses far surpasses the limited variety currently available for the Micro Four Thirds format.
Handling
The portability crown, hands down, goes to the Olympus in this head-to-head; with the zoom lens collapsed (or with the nice pancake lens mounted), the E-PL1 fits into a coat pocket or a handbag with little trouble, while the Nikon requires a neckstrap or backpack. As for handling comfort, while the Nikon is considerably larger, it still feels easy to maneuver, the weight keeping it secure in your palm without being tiring or cumbersome. The E-PL1 grip is short but still an effective gripping spot for the middle, ring and pinky fingers to gain needed traction, and the lighter weight makes on-handed shooting a more practical option. One area where the Nikon has an edge here is physical controls; the buttons feel solid and precise compared to the clicky Olympus buttons, and there's a well-positioned thumb wheel control on the Nikon which the Olympus sorely lacks.
Controls
The Nikon offers an extended ISO 6400 setting where the Olympus tops out at ISO 3200, along with a wider 5-stop exposure bracketing range and a 25% faster burst shooting speed. Shooting with the optical viewfinder, autofocus is much faster with the Nikon than the Olympus. However, Nikon's Live View autofocus is slow enough to be effectively unable with moving subjects, while the Olympus does a reasonable job as long as you're shooting relatively slow-moving objects (a cocktail party guest) and not flat-out speedsters (a running soccer player). In video mode, the E-PL1 supports autofocus while shooting, though the system is noisy; there is no continuous video autofocus for the Nikon. Video exposure controls for the Olympus are also more complete, and far easier to use.
NOTE: The images above are not used in our testing or scoring, but are included here to show real-world examples of the differences between cameras at the various ISO settings.
Samsung NX10 Comparison
Performance
As expected, the NX10 wins the image noise battle,pitting its APS-C sensor against the smaller Olympus Micro Four Thirds format. In other performance areas, though, it's a mixed bag. The Olympus offers terrific sharpness and far better color accuracy, while the Samsung delivered better low-light shots (again, largely due to superior image noise performance), a wider dynamic range and more accurate white balance. Neither camera is a burst-rate speed demon, with both at about 3 frames per second.
Components
The readily visible Samsung advantage here is a bright, beautiful 3-inch OLED display versus the ordinary 2.7-inch Olympus LCD. The fact that the NX10 has a built-in electronic viewfinder would be another major point in its favor (especially when Olympus charges nearly $300 for its optional EVF), but the Samsung EVF blurs and stutters badly when you move the camera — it actually made us queasy trying to line up shots at eye level. The Micro Four Thirds lens selection pales by comparison to standard Canon or Nikon SLRs, but it's a positive cornucopia of optical delights compared to what's currently available for the new Samsung proprietary mount (two lenses at launch, with a longer zoom promised for later this year).
Handling
The two cameras are both solidly built and, based on the specs, don't seem that different in size and weight. In practice, though, they handle very differently. The Olympus feels like an oversize point-and-shoot, comfortable for one-handed shooting if that's your pleasure, and small enough to toss in a small bag or large pocket. The Samsung, in contrast, feels like a very compact SLR, with its prominent viewfinder making the camera much taller than a point-and-shoot, and with a more SLR-style right hand grip. Both cameras have their challenges when it comes to controls. The E-PL1 doesn't have any control dial at all, a real pain when manually setting shutter speed, aperture or exposure compensation, where the NX10 has a top-mounted dial right behind the shutter. However, the four-way control on the NX10 is an undersized and uncomfortable little pivoting disc, trickier to manage than the Olympus cluster of four separate buttons.
Controls
For those who like point-and-shoot simplicity, we really like the way smart auto works on the Samsung NX10; it automatically chooses from a generous lineup of sixteen shooting situations, generally guesses right, and produces well exposed images as a result. The Olympus iAuto system is less flexible when it comes to scene recognition, but brings a different strength to the party with its live guide system, a plain English on-screen slider system that lets inexperienced users adjust aperture, for example, by deciding whether they want the background more or less blurred. While neither camera is a speed demon at full resolution, the NX10 does offer a very fast 30 shots per second at a reduced resolution setting that will work for on-screen viewing, if not substantial-size prints.
NOTE: The images above are not used in our testing or scoring, but are included here to show real-world examples of the differences between cameras at the various ISO settings.
Conclusion
Meet the tester
Steve Morgenstern
Editor
Steve Morgenstern is a valued contributor to the Reviewed.com family of sites.
Checking our work.
Our team is here for one purpose: to help you buy the best stuff and love what you own. Our writers, editors, and lab technicians obsess over the products we cover to make sure you're confident and satisfied. Have a different opinion about something we recommend? Email us and we'll compare notes.
Shoot us an email