
Physical Tour
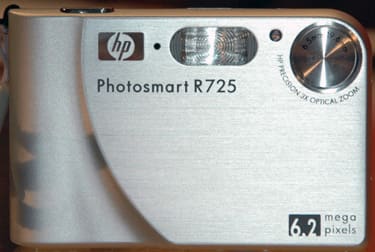
Front **
The front of the R725 features a small fixed lens in the upper right-hand corner. This leaves a mere sliver of body between the lens and meandering fingers of the left hand. To the left of the HP Precision 3x lens the user will find an AF assist light and horizontal in-camera Flash, which is positioned far enough off the center axis of the lens to create harsh and un-flattering shadows when used. Moving further left, there is a small pin-hole, which contains the monaural microphone for the camera’s audio recording in movie and audio clip modes. Curving along the left half of the front face, and scalloping out from a point at the top edge of the camera, is a graceful arc for a grip for the fingers of the right hand. However, there’s no textured gripping surface.
**Back **
The 2-inch LCD screen resides on the back of the camera and is framed in an oddly wide black frame, which makes this already undersized LCD seem smaller. Above the LCD the user will find an On/Off button that is horizontal, slender, and petite; a combination which makes any sort of quick activation futile. This button often demanded careful activation with a fingernail. All other controls on the camera function well and are proper in size, so it seems like an odd place to falter in functional design.
Directly adjacent and to the right of this control is a blue LED to indicate whether the camera is off or on. To the right of the LCD, the user will find an area that is slightly carved into the camera frame. At the top of this shallow basin the user will find a rotated L-shaped zoom toggle; it allows the user to enter multi-up and zoom when viewing images in playback mode. Beneath this zoom toggle is the well-sized four-way controller. In the center of the four-way controller is the Menu/OK button, also well sized, with full text labels. The up arrow also doubles as means of entry into the Shooting Mode menu. Below the four-way controller, and beside the LCD screen, the user will find the Delete button.
Right**Side**
The right side of the HP Photosmart R725 features a vertical port cover positioned on the lower half of the camera. The port cover must be pressed in and slid downwards to open. It reveals a DC in and a USB port. This cover is made of the same materials found on the rest of the camera body, and should be able to provide ample protection for these two features.
Left**Side**
The left side of the R725 has no controls or other features aside from two small screws which sit fairly flush with the camera surface.
**Top
**The top of the R725 features a number of essential controls. On the far left side of the top is an in-camera audio playback feature. To its right is the flash button, which will promptly display the flash settings for the R725 upon the LCD screen. Once displayed, these settings may be altered via the right and left arrows of the four-way controller.
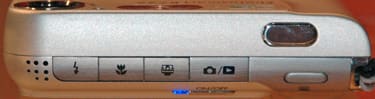
Continuing to the right, the user will find the focus button, which acts similarly to the flash control, providing users with an onscreen transparent menu which displays possible AF settings to select among. Beside the flash control will be the Photo Express button for instant access to the print and share features of the R725. And lastly, there is the Shooting/Playback button that allows users to efficiently toggle between these two modes.
To the right of these controls are two other important buttons for the R725. Positioned on an angled slope between the top and front of the camera, the shutter button is placed such that access is easy and comfortable. This ovoid button is large enough to allow even the most immediate and hurried snapshot to occur. Towards the back of the camera and slightly to the right of Shutter button, users will find the Movie Record button which switches the camera from still to video modes without entering onscreen menus. Finally, on the right edge of the top face, the eyelet for the optional wrist strap sits flush with the surface of the camera, a design feature which minimizes snagging when the R725 is slipped into a pocket.
Bottom
Located directly beneath the right-hand grip, users will find a port cover on the bottom of the camera which when unlocked exposes both the battery and optional memory card slot. The locking mechanism for this port should prevent this feature from accidentally opening or breaking during transport. Towards the center of the camera are two other features that connect the R725 to optional printer docks which do not come bundled with this camera. Forward from this, users will find a plastic tripod mount. Metal is better, but this is an inexpensive point-and-shoot, after all.
Components
Viewfinder
Like all three newly released R-series cameras, the R725 does not have a viewfinder. Although an optical viewfinder could be used to save battery life, there is a tendency to design viewfinders on point-and-shoots that are ultimately undersized, poorly framed, and inaccurate, so a viewfinder at this price level would be riddled more with problems than with benefits.
**
LCD Screen
**The HP Photosmart R725 comes with a moderate 2.0-inch LCD screen which is a fairly large drop from the overly generous 3-inch LCD found on the R927. HP reduced the pixel count as well, offering an LCD with a resolution of 153,600 pixels. This reduction in both size and pixels directly impacted the legibility of images and menus, and made navigation more complicated during extended use. It is possible to manipulate LCD brightness by entering the Set-up Menu.
HP states that this LCD has a viewing range of 170 degrees, and while this seems like an overly ambitious statement, the LCD can be legibly judged at angles fairly far off of 90 degrees.
Flash
The flash for the R725 is horizontal and placed to the right of the camera’s fixed lens, and flush with the surface of camera body. Not surprisingly, there are no accessory flash options or hot shoe. There is a slight amount of manual control over the flash settings, though it’s not as extensive as it is in other models within the point-and-shoot market. The user is able to select Flash on, Flash off, and Flash auto. These settings are initiated through the Flash button positioned on the top of the camera.
One of the larger selling points of the R725 is the automatic Red-eye reduction mode functional during capture, which is offered in tandem with the previously featured postproduction Red-eye correction. As mentioned before, the flash is positioned off the center of the lens axis, a design

that will have a tendency towards causing harsh shadows from one direction.
Zoom Lens
The lens on the HP Photosmart R725 is a 3x optical zoom lens system set into the body of the camera. This small lens is easily covered by wandering fingers of, thanks to its positioning near the edge. The fixed HP Precision lens is 6.5-19.6mm and has an aperture range of f/3.5 to f/7.4 in wide and f/4.2 to f/8.8 in telephoto. While the lens on the R725 does not protrude from the camera body, the top model in the R-series this year, the R927, features a telescoping lens.
Design / Layout
Model Design / Appearance
The HP Photosmart R725 is formed out of aluminum, and is thus much lighter than the stainless steel frame found on the high-end R927. This makes the camera seem a bit delicate. The surface of the camera is entirely without texture, so the frame has a sleek and clean feel although this also means that it’s easy to slip out of one’s grasp. Sleek as it is, this camera is not visually compelling and does little to separate itself from the point-and-shoot competition.
Size/Portability
The R725 is definitely not the heaviest camera of its class, weighing in at 4.9 oz. It owes its weight to the aluminum frame and the rechargeable lithium-ion battery rather than a stainless steel frame or AA batteries. The camera measures 3.7 x 1.2 x 2.4 inches and should fit into a pocket or a purse, and the addition of a wrist strap loop on the edge should provide users with a feasible carrying alternative for the short term.
**Handling Ability
**The small size of the camera is nicely contrasted by features which are both well sized and well spaced, a decision which should make handling comfortable and effortless. There aren’t grips with texture, and this plus the slender frame makes it a bit difficult to hold. The fixed lens on the camera is poorly positioned in the upper corner of the front face, perfectly placed for accidental finger obstruction. However, both the flash and microphone are placed away from wandering

fingers. Navigation is simple, thanks to well labeled buttons.
**Control Button / Dial Positioning / Size
**While most of the controls on the HP Photosmart R725 are well sized and spaced, one button is a constant irritant. It’s the On/Off button on the back of the camera, above the LCD screen. This button is a slender horizontal sliver of a control, and is also set into a scalloped section of the camera body. These design decisions make activating this control with a finger a nearly impossible activity. Instead, photographers must use a fingernail to activate this feature. Also, the button is often overlooked when searching for it because it is so small. It’s definitely at odds with the other controls.
Menu
The menu structure for the HP Photosmart R725 is designed as a simple to navigate, vertically scrolling list that enables users to concisely move through main and submenus via the four-way control. While the menu structure is nearly identical to the one found on the R927, it is less legible due to smaller screen and poorer resolution. That being said, full text descriptions are available for nearly all functions, and users can choose whether to have these or annotated descriptions displayed with example thumbnail images. The menu structure is transparent and engages a scrolling bar, so that a live view of the scene remains displayed at all times. Once full submenus are entered users are presented with an opaque background and a textual description with a thumbnail. When changing settings within the main Capture Menu, users will also be able to have live view alterations to manual control settings, allowing for an instantaneous understanding of what changes do the image.
Capture Menu -The Capture Menu allows users to access most camera settings that deal with real time controls over image parameters. This menu may be entered by pressing the Menu/OK button located on the back of the camera. Once it is entered, users will find access to Shooting Mode, Self Timer, Red-Eye Removal, Exposure Compensation, Adaptive Lighting, Image Quality, Video Quality, Burst, White Balance, Auto Focus Area, AE Metering, ISO Speed, Saturation, Sharpness, Contrast, Date/Time Imprint, and Exit. The Shooting Mode menu may also be entered by pressing the up arrow on the four-way controller, an appreciated shortcut to a more commonly used feature.
Set-up Menu - The Set-up menu controls the overall display and camera functions for the HP Photosmart R725. This menu provides control and access to: DISPLAY brightness, sound volume, focus assist light, Display Timeout, Instant Review, Digital Zoom, Date and Time, USB, TV Configuration, Language, Reset Settings, and Exit.
Design Gallery Menu - This new addition to the HP digital camera line is intended to replace the postproduction photo effect software often used by beginning digital camera users. This menu will allow users to enter into settings to control: Apply Art Effect, Modify Color, Add Borders, Remove Red-Eye, Rotate, Crop, and Exit. Many of these settings are fully automatic, which means that users won’t be able to dictate color settings of borders, size of borders, or other options, which is unfortunate since I personally thought some of the color results were unflattering or unappealing. All of the controls located within this menu function only as postproduction settings. In their respective full submenus, each digital effect parameter is displayed as a thumbnail with the image to be altered beneath. Once the feature is engaged, the new image is saved in conjunction with the original, allowing users to continue to build or regress as desired.
Playback Menu - The Playback Menu may be entered in two ways, either through pressing the Record/Playback button on the top of the camera, or by pressing the Menu/OK button and navigating over to this menu section. Users can then access settings for: Image Advice, Image Info, View Slideshow, Stitch Panorama, Record Audio, Move Images to Card, and Exit.
Help Menu -This inclusion by HP should be very helpful to beginning point-and-shoot users out in the field without a camera manual at their disposal. This menu is opaque and provides users the opportunity to read about: Top ten tips, camera accessories, camera buttons, using shooting modes, using design gallery, Sharing Images, Printing Images, Recording Audio Clips, Recording Video Clips, Reviewing Images and Video, Extracting Prints from Video, Deleting Images, Transferring Images, Managing Batteries, Getting Assistance, Camera Shortcuts, About, and Exit.
Photosmart Express Menu - The Photosmart Express Menu allows users to select images for further postproduction work, which includes uploading images onto the Internet and printing photographs from at home or online. Users can select among: Print, Buy Prints Online, Share All Images, Share Menu Set-up, and Exit
Ease of Use
Shooting with the HP Photosmart R725 was a simple procedure, with menu navigation that is both uncomplicated and helped by full text descriptions and thumbnails of nearly every setting found within each submenu. The Design Gallery settings were also straightforward and provided thumbnail views of the digital effects prior to saving images to memory. Scanning through longer menus to access manual controls is a bit tedious, and though placing manual controls inside in-camera menus does simplify the external surface of the camera, it certainly doesn’t make alterations quick. The in-camera help functions and live views of manual controls should be more than enough information for most novice point-and-shoot users.
Modes
**Auto Mode
**The R725 has a full Auto mode, which actually provides the most control over settings. The Auto mode on the R725 does allows manipulation of settings pertaining to ISO, AE metering, multi AF modes, EV Compensation settings, White Balance, Exposure / Color / Adaptive Lighting Bracketing, and color. It is not necessary to use these controls however, and users may choose to shoot with full auto control or shooting mode presets. The mode settings are located at the top of the Capture Menu in the Shooting Mode submenu, a menu which may be accessed via the up arrow on the four-way controller, or via the Menu button located on the back of the camera.
Movie Mode
The HP Photosmart R725 can record video clips at a rate of 24 frames per second with VGA quality resolution, 24 frames per second at VGA medium resolution, and QVGA quality at 15 frames per second. Simultaneous monaural audio recording is possible when recording video clips. The monaural microphone is positioned on the front of the camera, away from fingers which may muffle or obstruct clean audio recordings. Audio can also be recorded to previously captured still images. This feature is located within the Playback menu within the Audio Recording submenu.
Like still images, it is now possible to upload digital video clips onto Snapfish for sharing with approved users. The R725 can also extract stills from video clips during playback. To extract a still, the user must merely review the video clip and press Menu when the still to be exported is reached. Beyond these features the user will not be able to edit these clips further while working with them in-camera. Design Gallery features cannot be accessed when shooting videos which is a little surprising, considering the similarities between the effects and those commonly found within the preset options on inexpensive video editing suites.
Drive/Burst Mode
The HP Photosmart R725 does provide a Burst mode, located within the Capture Menu of the camera. The reported frame rate for the R725 is 3 frames per second for 3 frames prior to saving images to memory. The camera can also be set to two separate self-timer settings, one which shoots a single photograph after 10 seconds and one which shoots two photographs after 10 seconds.
Playback Mode
Playback Mode for the R725 is accessible via two separate control routes. Users may either press the Menu button on the back of the camera to navigate to the Playback Menu or they may press the Shooting/Playback button on the top of the camera.
Once in Playback mode, users may make alterations to images in the Digital Gallery or use the postproduction Red-eye reduction setting found within the Playback Menu. Along with this feature, users may also select Image Advice, a setting that provides advice on how to better produce quality images during future shooting situations. Similar to the Image Advice feature, users may engage the Image Info setting, which provides the time and date photographs were taken, name of photos on the memory card or internal memory, and other setting information.
Pressing the Trash button on the back of the camera deletes photos, and it is possible to delete either single images, full memory cards, or the internal memory. This external control should expedite the editing process and prevent users from having to sort thru menus. It is also possible to view slide shows of varying speeds, as well as images as single full frames, six up, or nine up multi-frame format thumbnails. Multi-up image format is accessed via the wide angle end of the zoom toggle. The playback zoom feature can be accessed by engaging the telephoto end of the zoom toggle. Video clips may be played back within Playback mode, although users will not be able to edit or manipulate this footage. There is an in-camera speaker on the top of the camera towards the left, so users may hear audio playback.
Custom Image Presets
There are a number of preset Shooting Mode options available through the Shooting Mode menu at the immediate top of the Capture Menu. These settings may be scanned within the main Capture Menu window, although only symbols for each setting are displayed. Users may enter the Shooting Mode Menu for text descriptions and thumbnail images for further explanations of these settings.
The HP Photosmart R725 comes with the following preset shooting modes: Help, Document, Sunset, Snow, Beach, Night Scenery, Night Portrait, Action, Panorama Left to Right, Panorama Right to Left, Theatre, Portrait, and Landscape modes. The Help menu is an overall description of how these shooting modes function, and will inform users as to how and when these presets could be employed to their advantage. The list is both quick to navigate and once the universal symbols are learned, the full Shooting Mode menu is unnecessary.
Control Options
Manual Control Options
There are several manual control options with the R725, although fewer than those which come with the high-end R927. The user will be able to control metering mode settings, Exposure Compensation, Adaptive lighting, Bracketing of Exposure / Adaptive Lighting / Color, ISO, and White Balance. The settings for these features are located within the main Capture Menu and although the menu is a bit long, it is still easy to navigate and alter. ISO, White Balance, and Exposure Compensation all display live view feeds, allowing users to immediately see the effects of alterations.
**Focus
***Auto Focus*
There is no manual focus setting on this camera model, so users will have to rely entirely upon the Auto Focus presets which come on the R725. Focus settings on the R725 are dictated through the Focus button found on the top of the camera. Once activated, a large transparent focusing screen will appear on the LCD and provide the following options: Infinity, Normal, Macro, and Auto Macro Modes. In addition to these, there are settings which will react to the structure of the overall image: multi focus and spot. The Auto Focus settings are quick to respond, with only a slight hiccup in the display on the LCD screen. There is no continuous or single focus setting, so this slight delay will occur regardless.
Manual Focus
Not surprisingly, considering its target audience, the R725 does not provide a manual focus feature. However, the manual focus feature on the high-end R927 of the same line is problematic, hard to gauge, and confusing, so it’s no great loss.
**Metering
**The metering mode on the R725 is located within the Capture menu and allows users three industry standard options for metering the lighting within a scene. The R725 provide Auto, Center Weighted and Spot metering systems. With these three systems users should be able to overcome some complicated lighting. The default metering mode is center-weighted and the camera will return to this setting if the reset menu option is selected. In instances with dark shadows and uneven lighting with high contrast, the user may also choose to engage the Adaptive Lighting feature, located within the Capture Menu. This setting may also be deployed with the Bracketing feature. The Adaptive Lighting Bracket mode allows users to shoot images with normal, low, and high image processing, in an attempt to minimize high contrast and create a more evenly lit scene. Metering modes may be changed in the main Capture Menu with live views.
Exposure
The R725 does not provide manual control over shutter speed or aperture settings. The user can only be able to control exposure in two ways. The HP Photosmart R725 has an Exposure Compensation control, located in the Capture Menu, which allows manipulation of +/-3 EV with 1/3 stop increments. It is also possible to control exposure by entering into the R725’s Bracketing feature. The Exposure bracketing feature allows the user to select between +/- 0.3 EV, +/-0.7 EV, and +/- 1 EV, allowing three images to be captured at once. Exposure Compensation may be adjusted with a live view, allowing users immediate visual recognition of the alterations they are making to their images.
**White Balance
**There a number of White Balance options available on the R725: full auto, full manual, or four preset modes. The four preset modes are Sun, Shade, Tungsten, and Fluorescent. The manual White Balance setting was quick to react and worked accurately on the showroom floor, something that didn’t always hold true for the auto white balance feature. The user must enter the Capture Menu to alter settings to White Balance, either by remaining within the main menu and scanning through symbols, or by entering into the full White Balance submenu. The first provides live views; the second, textual descriptions and a thumbnail image depicting when this setting may be appropriate.
**ISO
**The ISO range on the R725 by HP is manually controllable and is accessible by entering the Capture Menu or delving further into a submenu. The ISO range for the R725 is identical to that of the high-end R927 and allows users to select among Auto, 100, 200, and 400 ISO ratings.
Shutter Speed
There is no way to manually control shutter speed control on the R725, though it has quite a range of 16 seconds to 1/2000th of a second. This range should manage to cover most shooting situations that the point-and-shoot user may encounter.
Aperture
There is no manual control over the aperture range, which shouldn’t come as a shock, considering the lack of both manual focus and shutter speed control on this camera. However, it is a bit of a disappointment when these three manual control features are available on the more expensive R927. The automatic aperture range found on the HP Photosmart R725 is f/3.5 to f/7.4 in wide angle, and f/4.2 to f/8.8 in telephoto.
Image Parameters
Picture Quality / Size Options
There are several Image Quality settings available for the user on the HP Photosmart R725. The R725 can record still images in JPEG format, while it records digital video clips in MPEG-1. Still image settings of 2 MP****, 4 MP****, 6 MP**** Normal, and VGA (640 x 480) may be used when shooting, while video clips record at a frame rate of 24 fps at 640 x 480. These still images and digital video images may be uploaded to the Internet via Snapfish by HP for sharing photos with friends, family, and approved Snapfish members; prints of images can be ordered as well. The image quality controls are located through the Capture Menu.
Picture Effects Mode
The Picture Effects modes are where HP has really tried to set itself apart from other offerings in this price range. HP has consciously structured a Design Gallery mode that effectively eliminates the need for the Image Editing software bundles that come with digital cameras. This change to in-camera digital effects could mark an interesting change within the point-and-shoot camera market.
These features provide opportunities for alterations to image color, image effects, and the addition of borders, three basic areas of preset options which were previously covered by PC software. HP has done much to simplify the editing process by letting it be done ‘in-house’. Attention to what happens to an image post-capture is a staple of Kodak’s EasyShare line. Let's see what happens as HP challenges them with this R-series.
The R725 comes with the following effects from within the Gallery Design menu:
Artistic Effects Menu - The Artist Effects menu provides users digital effects that manipulate images during postproduction editing. Some of the options are useful, others less so. The settings within this menu, which is located under the Design Gallery submenu, are; Ink Dots, Cartoon, Water Color, Center Focus, Posterize, Retro, Soft Glow, Vintage, Slimming, Sky Color, Ground Color, Kaleidoscope and Solarize. Settings like Vintage and Soft Glow do successfully emulate such corresponding preset shooting features found with most accompanying software suites. However, settings like Slimming produce a fun-house effect that blurs the edge of the photo while narrowing the center. The height of subtlety, this is not.
Modify Colors Menu - Within the same Design Gallery menu users may also choose to engage the features found with the Modify Colors Menu: Black and White, Sepia, Black and White Tints and Color Tints. These settings are accurate and can replace the corresponding effects in postproduction image editing.
Add Borders Menu – This feature judges the image content within each specific photo and gauges the appropriate border color to be applied; the choice isn’t always flattering or visually pleasing. Most of these effects appeared contrived and forced when viewed on the LCD. This one needs some work, HP. The Add Borders Menu includes Soft Edge, Inset Border, Torn Edge, Burned Edge, Spatter, Oval, Circle, Rectangle, Rounded Rectangle, and Square.
All three of these submenus will display a description and an actual thumbnail of each setting, demonstrating the effects of each digital change upon images. These settings may not be engaged when the user is shooting digital video clips; HP should look into expanding here. The altered image will be saved in addition to the original image.
Within the Capture Menu the user will also find three other options for making alterations to images, although these occur as a real time changes, rather than postproduction ones. They include contrast, sharpness, and saturation, although they only allow users to select between normal, high, and low settings.
Connectivity / Extras
Connectivity
Software
Despite all the in-camera options, the HP Photosmart R725 is slated to come packaged with additional software anyway. HP may intend for the in-camera effects to be comprehensive, but while some of the effects found within Design Gallery are functional, users can’t dictate important settings like border color. (The camera would sometimes come up with odd shades such as puce.) The camera comes with the HP Photosmart Express editing software.
Ja*cks, Ports, Plugs
*This camera does not come with a printing dock for either WiFi or cabled printing, so users will need to rely upon the USB 1.0 port positioned on the right side of the camera body for connection to PC, television or printer. Also underneath this cleanly constructed port cover, users will find a DC in port for optional alternative powering, a feature distinctly missing from the higher-end R927. The camera is able to engage in direct printing along with connection to Snapfish and a PC. There is a printer dock port on the bottom of the camera body, positioned alongside a tripod socket constructed out of not-so-durable plastic. On the base of the camera body beside the tripod socket is a locking port cover that protects the lithium-ion battery and the memory card. The construction of this port cover ensures that accidental mishandling will not result in damaged or lost media or batteries.
*Direct Print Options
*The direct print features for the HP Photosmart R725 are available as either a direct connection between the camera’s USB port and a printer, or through either WiFi or standard printer docks that connect to the bottom of the camera body. But with that being said, the user of the R725 will find a distinct lack of a printer dock upon examining the contents of the box. HP has decided that this lower priced R-series camera will come only with cables for connection to printer or computer. Additional docks will need to be purchased separately, an unfortunate and unpleasant hidden cost.
The HP Photosmart R725 allows users to crop images, manipulate image effects with Design Gallery, rotate images, and upload images to the web or PC in addition to standard direct printing. While not one-button printing, the Photo Express menu is easy to navigate and will give users the opportunity to select images for printing or sharing. The user will be able to select between 34 separate destination folders including printers and email addresses.
Battery
The HP Photosmart R725 comes with a rechargeable lithium-ion battery. Users may want to purchase a second one as a backup while the first is recharging.
Memory
The R725 by HP does have 32 MB of internal memory, and there is also an optional SD memory card slot located on the bottom of the camera. Both the card and the battery slot are hidden by a port cover on the bottom of the camera. The 32MB memory card should provide a good starting point for memory, although larger cards would be required for a multitude of higher resolution images or longer digital video clips.
**Other Features
***Image Advice* - This setting provides users with information regarding potential and already taken images, hopefully giving beginners a push up the learning curve.
Image Info - This option, which may be found within the Playback Menu, enables users to view an image along with corresponding information regarding the size, name, time and date of the photograph.
Adaptive Lighting - When shooting in lighting situations that involve high contrast or deep shadows, the Adaptive Lighting feature could be used to provide a more even and less extreme dynamic range. This setting may be used as a Bracketing option as well, allowing users to capture three images at Normal, Low and High.
Overall Impressions
Value
The HP Photosmart R725 has a reasonably-sized 2.0-inch LCD, a 6.2 effective MP CCD, numerous in-camera postproduction editing procedures which work with varying success, and several manual control options with full Help menus. The price at this time has not been decided, though the price range for the entire series was placed at under $400; this model should be an affordable option for many consumers.
The camera is petite and certainly portable, due to the aluminum frame’s light weight. It has video clip capabilities, optional WiFi bases compatibility, and the ability to directly upload, print and share images to a variety of folders. The menu structure and help features will be a great asset to any user who wants to begin experimenting with manual controls but feels overwhelmed by the prospect of keeping track of what does what. The R725 isn’t going to turn heads with its design or visual aesthetics; however, for the money it appears to provide strong basic point-and-shoot capabilities with simple navigation and in-camera editing opportunities.
Who It's For
Point-and-Shooters -This camera makes the most sense for the point-and-shoot crowd, particularly those looking to avoid the hassles of PC editing software and complicated camera structures. With a full auto mode and presets on board, wandering into manual mode won’t be necessary.
Budget Consumers -For the budget consumer, this model is probably the more suitable choice than the R927, although manual controls, LCD size, and overall aesthetics have been lost in favor of a lower price.
Gadget Freaks -There are no features on this camera that would mesmerize a gadget freak. The preset shooting modes and Design Gallery features are interesting, but they won’t satiate the true Gadget Freak’s need for serious editing tools.
Manual Control Freaks - Having lost manual shutter, aperture, and focus; the R725 is bound to disappoint the average manual control user. Out of HP’s newly released 2006 cameras, the R972 is the best choice for this level.
Pros / Serious Hobbyists - There is no real reason for the Pro or Serious Hobbyist to use this camera. The size, lack of controls, and the presets/Design Gallery features are no contest against an extensive knowledge of Photoshop.
Conclusion
Conclusion
The HP Photosmart R725 is a small and easily portable camera for both beginning and casual point-and-shoot enthusiasts. The menu structures are easy to navigate, with a plethora of partial and full text options provided with both live view and example thumbnails. The inclusion of an automatic red-eye reduction feature is handy. The camera does move somewhat beyond sheer Auto mode, providing both custom image presets and manual control over settings like Bracketed Exposure, Exposure Compensation, Flash, Metering, and other options.
The Design Gallery is both a success and a failure. It provides some feasible and interesting options like Kaleidoscope, but also includes an aggravating border mode that doesn’t let users dictate color. Although this feature isn’t going to satisfy those already familiar and comfortable with Photoshop, these settings will most likely appeal to users who want a postproduction experience without expending much effort.
The lack of a cabled or WiFi printer dock is unfortunate; the user will however be able to upload photos via the USB port (thought it's only USB 1.0). Users of the HP camera R-series can also save their images and digital video/audio clips to Snapfish, a website which allows users to order prints, and share images with approved members.
All in all, the HP Photosmart R725 provides some interesting additions to the point-and-shoot marketplace, and it definitely improves upon HP models of the past few years. Whether or not these cameras will result in a real challenge to the emerging EasyShare empire will be decided with further testing and examination.
Meet the tester
James Murray
Editor
James Murray is a valued contributor to the Reviewed.com family of sites.
Checking our work.
Our team is here for one purpose: to help you buy the best stuff and love what you own. Our writers, editors, and lab technicians obsess over the products we cover to make sure you're confident and satisfied. Have a different opinion about something we recommend? Email us and we'll compare notes.
Shoot us an email